Salesforce Files
Events
Cloud Elements currently supports events via polling or webhooks depending on the endpoint.
- Polling is a mechanism where Cloud Elements executes the configured query every
nminutes and captures the changed information. - Webhooks are when the provider lets Cloud Elements know what information has changed. Note that additional endpoint setup may be required prior to creating your Element Instance.
If you would like to see more information on our Events framework, please see the Event Management Guide.
Cloud Elements supports both webhooks and polling events for Salesforce.
Polling
In order to enable polling, add these extra configurations to your instance JSON:
"event.notification.enabled": "true",
"event.notification.callback.url": "<INSERT_YOUR_APPS_CALLBACK_URL>"
instance JSON with polling events enabled:
{
  "element": {
    "key": "sfdcdocuments"
  },
  "providerData": {
    "code": "<Code_On_The_Return_URL>"
  },
  "configuration": {
    "oauth.callback.url": "https://www.mycoolapp.com/auth",
    "oauth.api.key": "<Insert_Client_ID>",
    "oauth.api.secret": "<Insert_Client_Secret>",
    "event.notification.enabled": "true",
    "event.notification.callback.url": "<INSERT_YOUR_APPS_CALLBACK_URL>",
    "event.vendor.type": "polling",
    "event.objects": "<INSERT_COMMA_SEPARATED_LIST_OF_OBJECTS_e.g_Account,Contact>"
  },
  "tags": [
    "<Add_Your_Tag>"
  ],
  "name": "<Insert_Instance_Name>"
}
Webhooks
When implementing webhooks for Salesforce, Cloud Elements creates APEX classes and triggers in order to send webhooks. This can only be done in a Salesforce sandbox account. If you want to support webhooks in a production Salesforce account, you'll have to make some modifications and migrate those classes to production according to the Salesforce specification. View more information regarding the Salesforce specification.
Follow these steps to setup your Salesforce application with the endpoint.
In order to create a Salesforce Element Instance you must have the Enterprise edition or Professional edition with API support is required. Also, to set up a new application in Salesforce, you must have Administrator privileges. Please contact your system administrator if you do not have those privileges.
Via a web browser, login to your Salesforce account: https://login.salesforce.com/
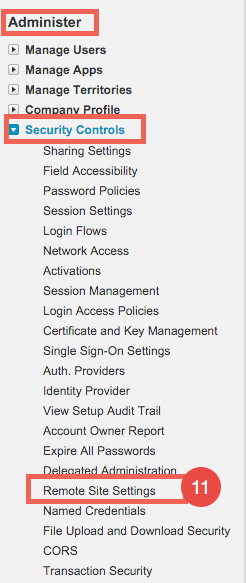
Under "Administer" > "Security Controls" > select "Remote Site Settings"

Click “New Remote Site”

Input “Remote Site Name” e.g. Cloud Elements and the following URL:
https://api.cloud-elements.comClick “Save”

NOTE: Our current support for Salesforce Events include listening for the following: Creating, Updating, and Deleting of any object in Salesforce. For example, when a new account is created, your application will receive a notification regarding the creation of the account.
The following JSON may be used to create a Salesforce Instance with webhooks enabled:
{
  "element": {
    "key": "sfdcdocuments"
  },
  "providerData": {
    "code": "<Code_On_The_Return_URL>"
  },
  "configuration": {
    "oauth.callback.url": "https://www.mycoolapp.com/auth",
    "oauth.api.key": "<Insert_Client_ID>",
    "oauth.api.secret": "<Insert_Client_Secret>",
    "event.notification.enabled": "true",
    "event.notification.callback.url": "<INSERT_YOUR_APPS_CALLBACK_URL>",
    "event.vendor.type": "webhook",
    "event.objects": "<INSERT_COMMA_SEPARATED_LIST_OF_OBJECTS_e.g_Account,Contact>"
  },
  "tags": [
    "<Add_Your_Tag>"
  ],
  "name": "<Insert_Instance_Name>"
}