Element Builder
Element Builder UI BETA
Element Builder gives you the ability to create custom integrations to cloud services using the Cloud Elements API Management Platform.
Twitter will be used for this demonstration. A new Twitter connected app must be created prior to building the Element.
Cloud Elements strongly recommends researching the endpoint prior to starting any work in Element Builder. It is important to answer the following questions about an endpoint:
- Is there public API Documentation?
- Is the public API REST?
- Does the endpoint require a connected app with an API key and secret be created?
- What type of Authentication is expected (Basic, OAuth 1, OAuth 2)?
- Does the endpoint support search by last updated date or have webhook support for events?
Prior to beginning work, research was done on the Twitter API. The following was discovered:
- Twitter API Documentation: https://dev.twitter.com/overview/documentation
- API is REST
- Connected app required to connect to the endpoint
- Authentication Type: OAuth 1.0a
- Twitter does support search by last date updated
The Twitter API is well documented with example calls of authentication, each entity/resource, and even code samples. This is not always the case with every endpoint.
Let’s get started with the construction of the Twitter Element by first creating a new Twitter connected app.
Follow these steps to set up a Twitter application with the endpoint.
Via a web browser, go to https://apps.twitter.com/.
Click “Create application”.
Enter you callback URL. For this example, let’s assume that the URL for your application is:
https://www.mycoolapp.com/oauth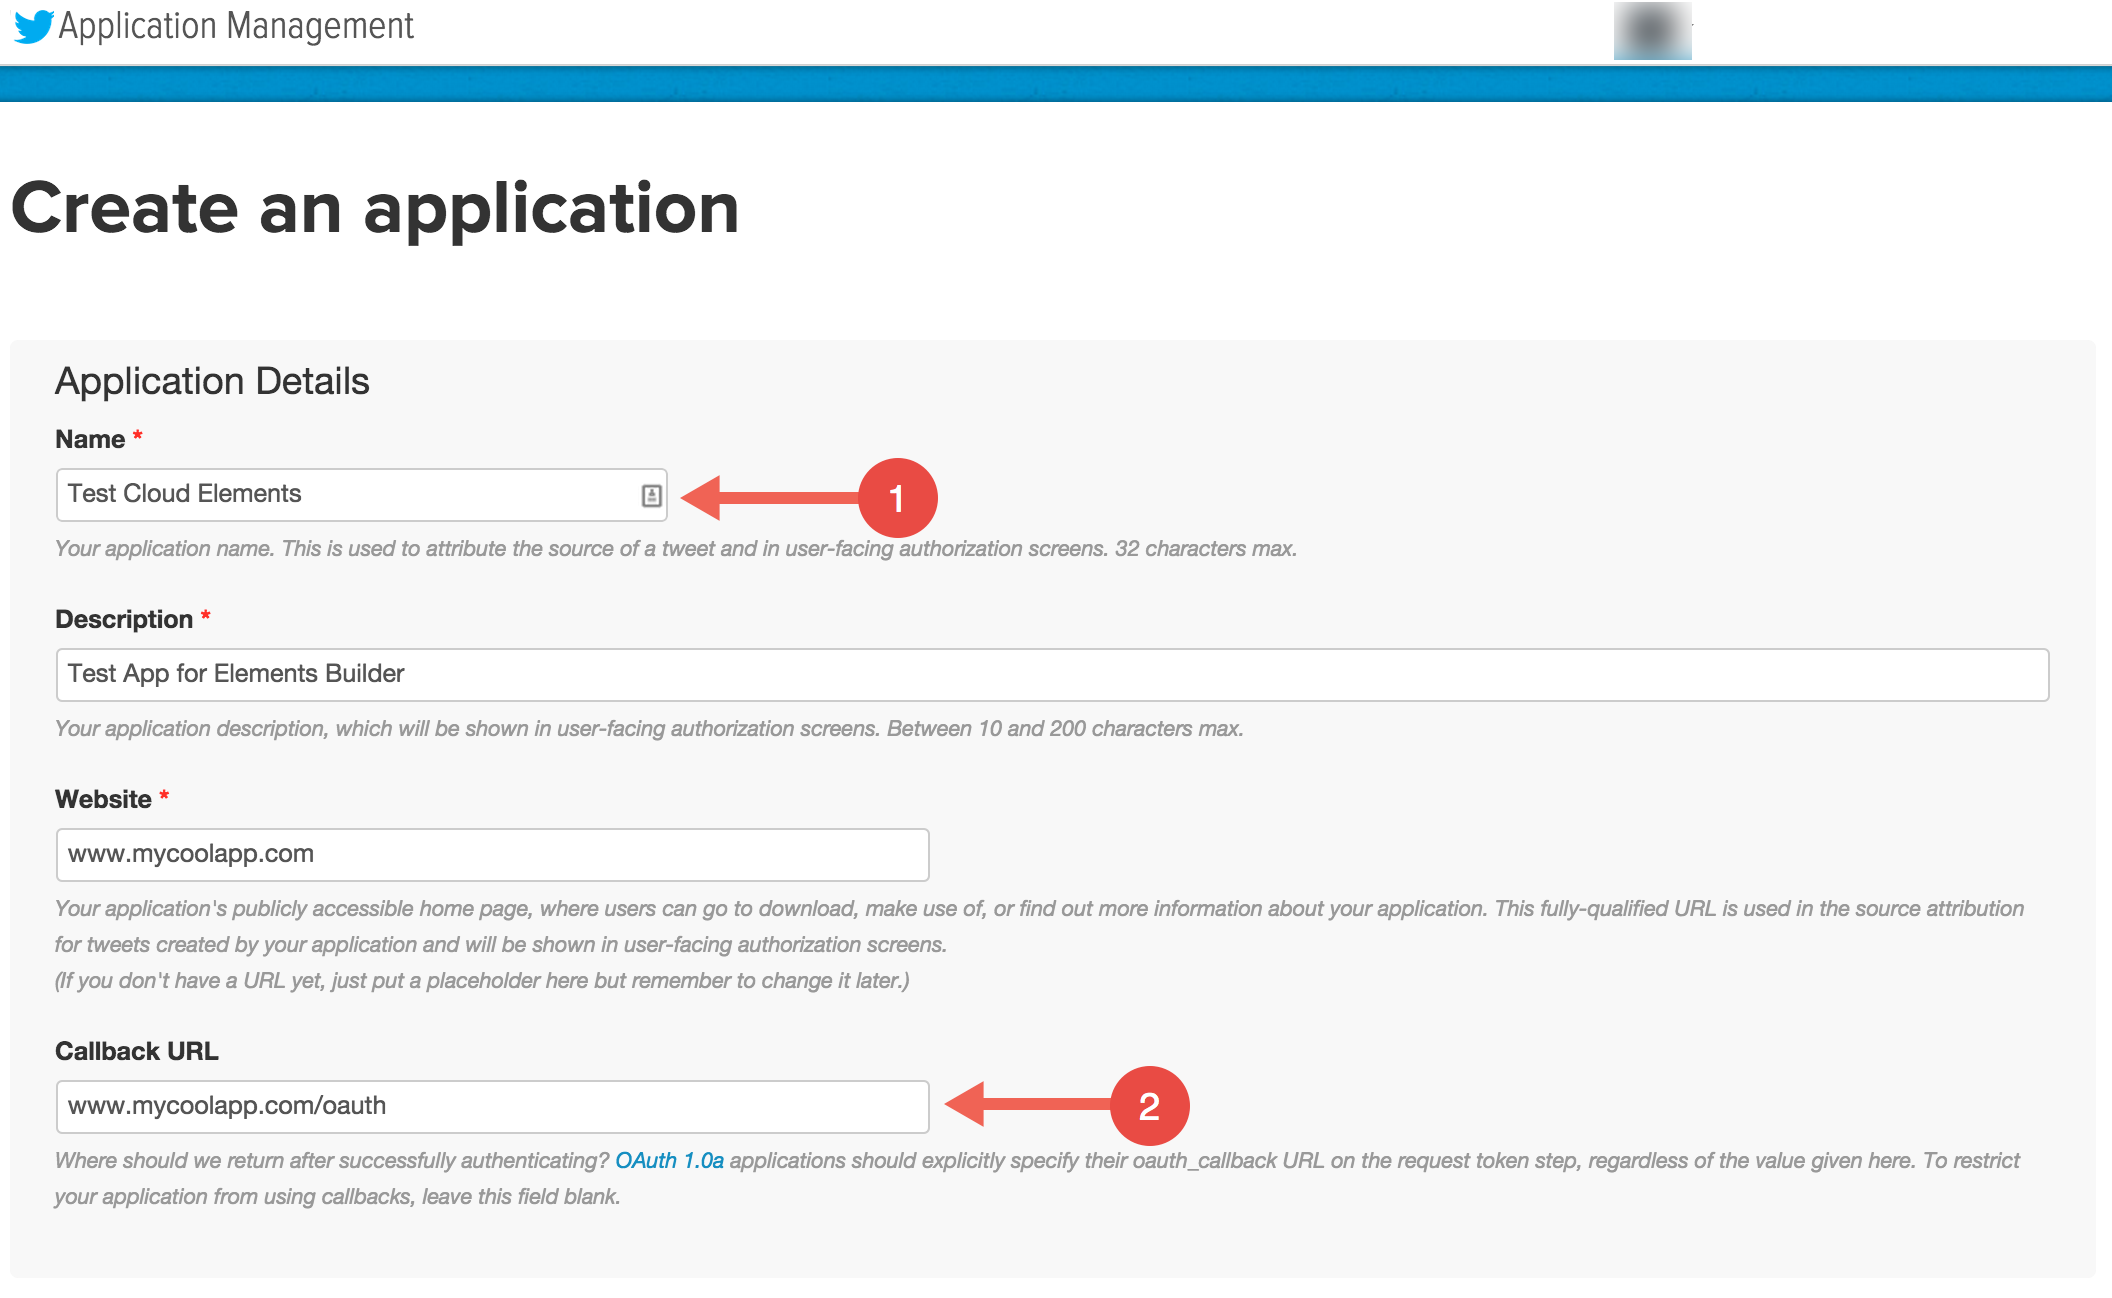
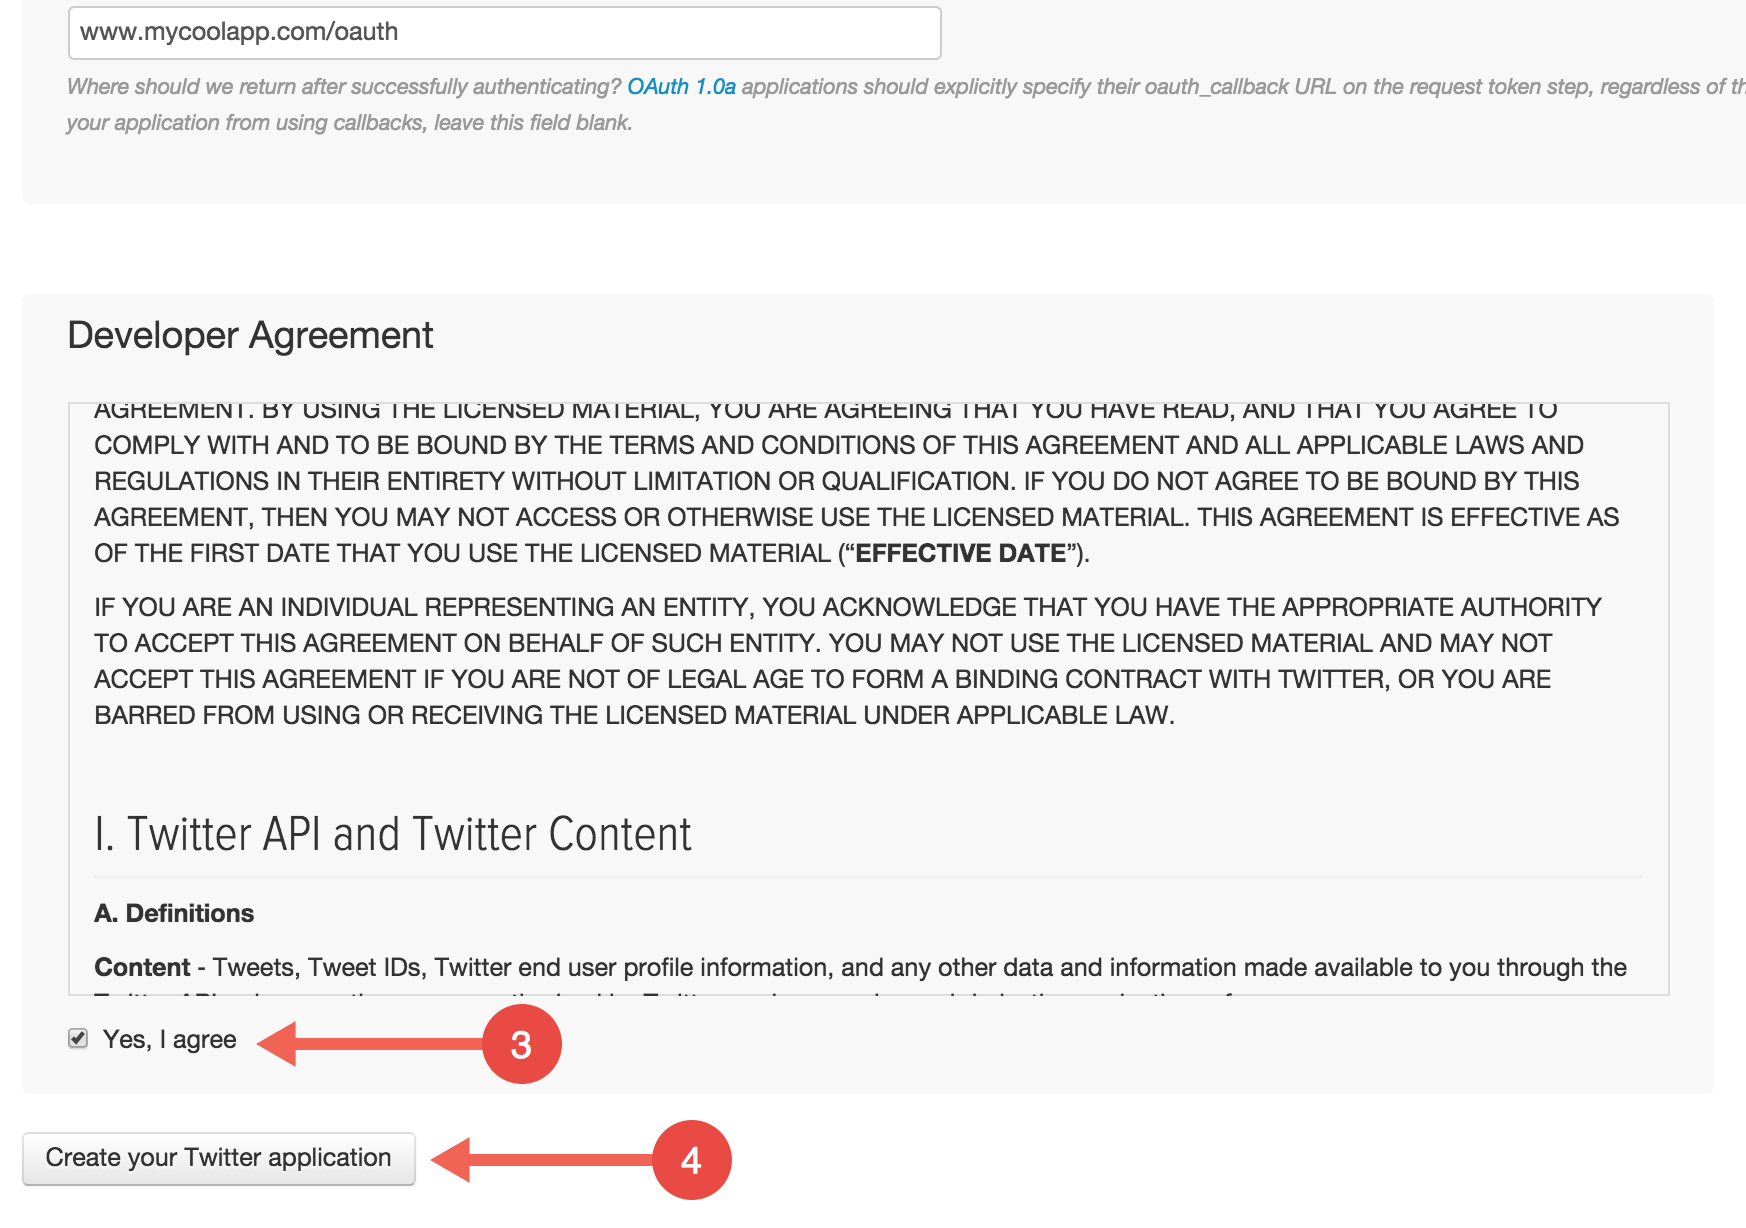
Click “Yes, I agree”.
Click “Create your Twitter application”.
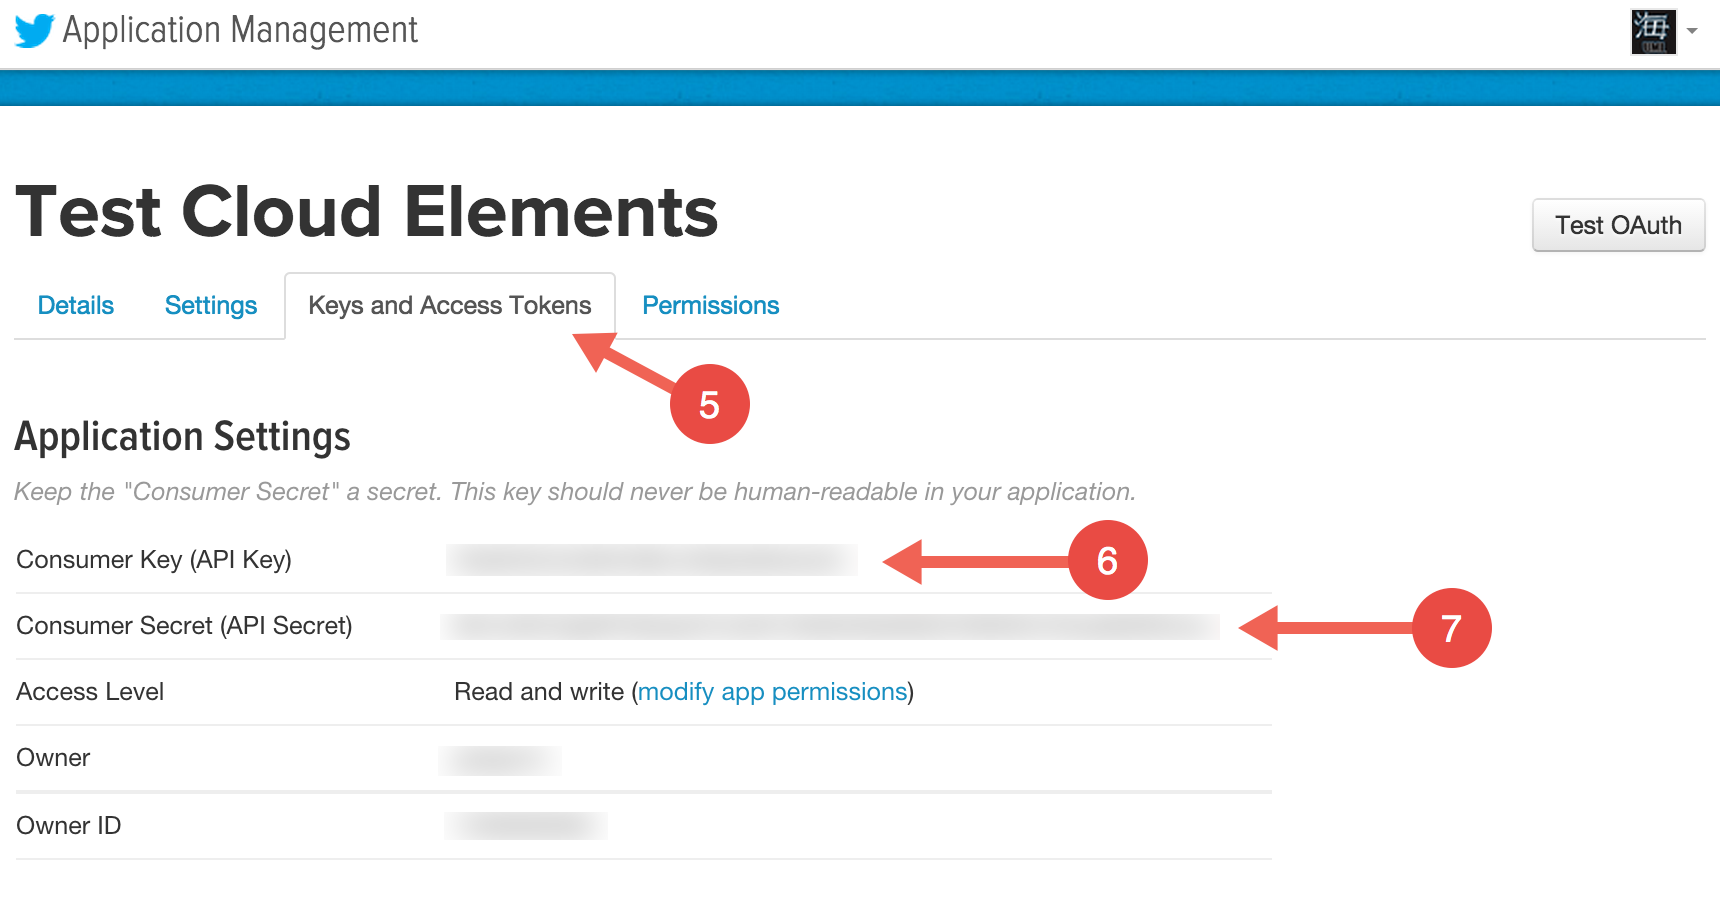
Click “Keys and Access Tokens”.
Copy “API Key”.
Copy “API Secret”.
The next step is to log in to the Cloud Elements API Manager and begin building the Twitter Element.
Create New elements
Log in to the Cloud Elements API Manager
Click “Elements Builder”

Click “Build Element”

Info Tab
Select a Hub e.g. Social Hubs map resources from a collection of endpoints (What we call Elements) into a uniform set of APIs. Add a new hub from the dropdown menu to create a new collection if our defaults do not meet your needs.
Name of the new Element, e.g. Twitter or My Twitter Element
Add a description for the new Element. e.g. Add a Twitter Instance to connect your existing Twitter account to the Social Hub, allowing you to manage your statuses, pictures, etc. across multiple Social Elements. You will need your Twitter account information to add an instance.
Add a URL to an image or logo to represent the new Element.
Select the type of authentication the endpoint expects. The four types supported by Cloud Elements are Basic, OAuth 1, OAuth 2, and Custom. * Basic is a type of authentication where an enduser provides a username and password. It is not always the username and password, some endpoints ask for the API key and secret without disclosing the enduser’s credentials. * The OAuth 1 protocol enables authentication to the endpoint without requiring users to expose their credentials. OAuth 1 is a 3 step authentication process. It is an older protocol. The OAuth 1 protocol involves signing the payload on every request and thus is used by many financial services. * OAuth 2 authentication is a newer two step process employed by many of the today’s modern cloud services like Google. * Custom authentication is completely user defined, such as a username and password exchanged for an API key with some type of expiration involved.
Click “Next”

Configuration Tab
Add the base URL to the endpoint. The base URL is the endpoint where all API requests will be sent, e.g. https://api.twitter.com/1.1.
The Base URL can be found in most endpoint API Documentation within the Overview, Authentication, or Resources/Entities sections.
The Twitter Base URL can be found in the Resources/Entities section.
Select the page size, e.g. 100 objects per page.
Select the paging type. Page is the default, but Offset is available to view portions of data, as well as, Cursor to move through large data sets.
Input the OAuth Authorization URL Most endpoints have this information in the Authentication section of the API Documentation. Twitter’s OAuth Authorization URL can be found at https://dev.twitter.com/oauth/reference/get/oauth/authorize.
Input the OAuth API Key The API Key is generated when the connected app is created.
Input the OAuth API Secret The API Secret is generated when the connected app is created.
Input the OAuth Callback URL
The same callback URL used when the connected app was created. In our example: https://www.mycoolapp.com/oauth.
Input the OAuth Token URL Most endpoints have this information in the Authentication section of the API Documentation. Twitter’s OAuth Token URL can be found at https://dev.twitter.com/oauth/reference/post/oauth/access_token.
Input the OAuth Scope (Optional) Some endpoints require read and write privileges to objects. This information can be found in the Authentication section of most endpoint API documentation.
Input the OAuth Token URL Most endpoints have this information in the Authentication section of the API Documentation. Twitter’s OAuth Token URL can be found at https://dev.twitter.com/oauth/reference/post/oauth/request_token.
Select the OAuth Request Authorization Type Cloud Elements supports two types: Query and Header Query will send the request in the URL path, while Header will send the request as a header.
Select the Accept Header and the Content Type Header Cloud Elements supports two types: JSON and XML. Please select the type the endpoint expects. In our example, Twitter expects JSON payloads.
Click “Next”
Configurations, Parameters, and Hooks will not be covered in this guide as Twitter does not require any beyond the defaults provided by Element Builder.
However, here are some definitions:
- Configuration: A value which is stored when a connection to the endpoint is created. This value is populated via user input and will be used when invoking the API, e.g. an apikey and apisecret.
- Parameter: A globally defined value that will apply to all API calls. Parameters can be sent as a header, path, query, body.
- Hooks: Pre-Hook: Action you wish to execute prior to sending API calls e.g. manipulating or adding data (query, header, path, body, configuration).
Post-Hook: Modify the response data (body, header, configuration) on the return call from the endpoint.

Instance Tab
Test the connection to the endpoint by creating an instance.
Input a name for the instance, e.g. Test
Click “Create Instance”
In our example, this will take us through the Twitter OAuth 1.0a workflow. A login screen will be presented, credentials inputted, and authorization of the app granting permission to the Twitter user profile.
Click “Next”

Resources Tab
Add entities/resources to your Element within the Resources Tab. Resources will need an HTTP verb like POST, GET, PATCH, PUT, or DELETE associated with it. If the Element being created can be identified with one of Cloud Elements current hubs, pre-built resources can be used to get started in mapping out resources.
We will begin adding a resource from one of the pre-built items available since we added Twitter to the Social Hub. Once we complete adding that resource, we will add one from scratch.
ADDING A RESOURCE FROM CLOUD ELEMENTS PRE-BUILT API CALLS
The endpoint API documentation will be needed to find out the following:
- vendor path of the resource
- HTTP verb
- JSON payload if applicable
In our example, Twitter was placed within the Social hub. There are 5 pre-built resources available. See screenshot.
To add a pre-built resource click the “arrow” and the resource will be added. In our example, we will add the GET /users resource from the pre-built list.
Click the arrow in the GET /users resource

The pre-built GET /users API call will have some fields already populated. In order to complete the resource fields, the endpoint documentation will be needed.
In our example, Twitter provides API documentation for the GET /users/search resource here: https://dev.twitter.com/rest/reference/get/users/search
The Twitter documentation reveals the vendor path to the resource:
https://api.twitter.com/1.1/users/search.json
Since the base URL was inputted on the Configuration Tab, only the /users/search.json is needed.
Select the “Type” , e.g. API as we are adding an API
Input /users/search.json in the “Vendor Path” field
The method and description have been populated as well. We will touch on these when we add a resource from scratch in the next section.
The parameters will need to be added next. A parameter must be defined on the Cloud Elements side and the vendor side. For example, in our GET /users API call, the pageSize will be what Cloud Elements expects. Twitter expects count instead of pageSize. We reflect these name variations within the parameter fields. Let’s take a look at this example in the Element Builder UI.
The column on the left is what Cloud Elements expects. The column on the right is what the endpoint expects, in this case, Twitter. Let’s take a look at the fields:
- Name: Cloud Elements uses pageSize when getting the number of records on a page.
- Vendor Name: What the endpoint expects. In our example, Twitter refers to “count” as the number of records on a page.
- Type: Query – Cloud Elements is sending the endpoint a query request.
- Vendor Type: Query – the endpoint expects a query search in this API call.
- Data Type: Integer – the data type (string, integer, etc)
- Vendor Data Type: Integer – data type the endpoint expects
- Parameter Source: Request – the request is coming from Cloud Elements to the endpoint. The reverse is also possible, Cloud Elements receives a response from the endpoint. In our example, we are sending a
GETrequest to Twitter. - Is it Required?: If the endpoint expects this parameter on every API call, select “yes”. If it is optional, select “no”.
- Description: input a description of the parameter, e.g. the number of objects to be returned.

Click “Add Parameter”
Populate the parameter with the data above
Click “Done”
The information required for the vendor fields was found in Twitter’s API documentation: https://dev.twitter.com/rest/reference/get/users/search.

Cloud Elements supports the following parameter types:
Configuration: value that has been saved to the instance Header: value to be added in the header of the API request Path: value to be added to the URL of the API request Body: value to be sent with as data such as a JSON payload with the API request Query: query request Form: needed when multiple items must be sent in parts such as an ID, followed by the body Multipart: needed when performing a file upload Value: an exact value to be sent with the API request Body Field: field sent in the body of the request Body Token: token sent in the body of the request
Let’s add the other two parameters needed to complete the GET /users API call: page and where. These three parameters are needed by Cloud Elements to properly make a GET request on a resource. We’ll use the Twitter API documentation once again to complete the parameters.
Let’s begin with the page parameter.
Click “Add Parameter”
Input each of the fields: * Name: page * Vendor Name: page – taken from the Twitter documentation * Type: Query * Vendor Type: Query * Data Type: integer * Vendor Data Type: integer – taken from the Twitter documentation * Parameter Source: request – Cloud Elements is making the request * Is it Required?: No – according the Twitter documentation it is optional * Description: Specifies the page of results to retrieve.
Click “Done”

One pre-built parameters were included in the GET /users call. The vendor fields must be completed.
Under “where” click “Edit”

Input each of the vendor fields: * Vendor Name: converter:toQueryParameters – this is to convert the call from the Cloud Elements Query Language (CEQL) to a vendor query * Vendor Type: Query * Vendor Data Type: string – taken from the Twitter documentation * Parameter Source: request – Cloud Elements is making the request Is it Required?: Yes – according the Twitter documentation it is required * Description: The CEQL search expression. The only valid field to search by is ‘q’ which represents the users’ username
Click “Done”

Test out the newly created API by clicking “Try it out”
This action will open a sliding panel displaying the newly created API call.

In the ‘where’ field, input ‘q=”jonsmith”‘ The q=’username’ is the format in which Twitter expects query requests. Information taken again from the endpoint’s API documentation.
Click “Try it out!”

This action will execute the API call. The column on the right will show you information regarding the vendor request – what Cloud Elements sends to the endpoint. This is very helpful when trying to debug an API call.
The column on the right displays the object returned from the executed API call.

ADDING A RESOURCE FROM SCRATCH
Adding a resource from scratch is very similar to using one of Cloud Elements pre-built resources with the exception of completing a few more fields.
For this example, the POST /statuses resource will be added to our Twitter Element, otherwise known as tweeting. The API documentation will be needed found here: https://dev.twitter.com/rest/reference/post/statuses/update.
Looking at the API documentation, the tweet must be sent as JSON in the form of a query within the URL. The only required parameter is ‘status’. This parameter will be added, however the other optional parameters will not for this demonstration.

Click “+ Add”
Select the Resource Type, e.g. “API”
Input the Path: /hubs/social/statuses
Input the Vendor Path: /statuses/update.json – taken from the Twitter API documentation
Input the Method: POST
Input the Vendor Method: POST
Input the Description – what your users will see when they view the API documentation, e.g. “Create a new status for your profile”

Click “Add Parameter”
Input the Parameter Fields: * Name: status * Vendor Name: status * Type: Query * Vendor Type: Query * Data Type: string * Vendor Data Type: string * Parameter Source: Request * Is it Required: Yes * Description: The text of your status update
Click “Done”
Click “Try it out” and test the new resource

Input a Tweet
Click “Try it out!”

View the response
Again, this screen can be used to inspect and debug requests and hooks.
To add more resources, repeat the steps outlined above.

ADDENDUM: Models Tab
The Models Tab is an additional feature with some optional functionality to make resource creation more streamlined.
NOTE: This functionality is only available for endpoints with JSON payloads. SOAP endpoints or endpoints with XML payloads are not currently supported.
The Freshdesk endpoint will be referenced in this portion of the documentation.
The Models Tab allows the user to build resource models via customization, as well as, an import function.
We will take a look at the Freshdesk Company endpoint which we will map to the Account resource.
A review of the Freshdesk API documentation is needed prior to making any changes to the resource. The docs can be found here: https://developer.freshdesk.com/api/#view_company
MODEL CUSTOMIZATION
Click on the Models Tab. If you have any unsaved progress, an alert will appear asking if you want to save your changes.
The current list of API resources will render.
Select a model to edit. In our example, we will be viewing the GET /accounts resource.

Looking at the “updated_at” field, we can see the value is a date.

In our model, the data type is set to string.

This can be modified within the code editor.
Change “type” to “date”
Click “Save Model” to update the resource

IMPORT MODELS
To import a model, head to the endpoint API documentation. Navigate to the desired resource and locate the example response.
Copy the response payload.

Select the resource in the list: GET /accounts
Click “Generate from Payload”

Paste in the model
Click “Generate Model”
The model is now built. If you wish to make any changes, they can be made right in the code editor panel. Just remember to save your changes.

Events Tab
Events: Cloud Elements currently supports building integrations with polling or webhooks capability. Polling is a mechanism where Cloud Elements executes the configured query every n minutes and capture the changed information. Webhooks are when the provider lets Cloud Elements know what information has changed.
Polling: In order to enable polling, the endpoint must support querying an object by last updated date.
Webhooks: In order to enable webhooks, the endpoint must support them. Note additional endpoint setup may be required prior to creating your Element. An event hook script must be defined that transforms the inbound event data to a format that Cloud Elements supports.
Twitter supports a createat field. However, they do not support an updatedat field. Since the updated_at field is not supported, polling will occur on objects created since a certain day and time.
Let’s take a look at an example.
Partial JSON payload of Twitter GET /users resource:
[
  {
    "profile_sidebar_fill_color": "DDEEF6",
    "profile_background_tile": true,
    "profile_sidebar_border_color": "C0DEED",
    "name": "Twitter API",
///////////////////////////////////////////////////////
////"created_at": "Wed May 23 06:01:13 +0000 2007",////
///////////////////////////////////////////////////////
    "profile_image_url":
    ...
  }
]
We’ll be using the created_at field in our where clause below.
Select “Yes” for “Enable Events and setup events configuration
Select “Polling”
Under the “users” resource click “Edit”

In the “Where field with operator” field, input created_at with operator >, or created_at >
Select a date format that the endpoint expects. This information is available under the endpoint API documentation.
Under the advanced section, input created_at in the Update Date Field and Created Date Field.
Select the same Date format as above to match what the endpoint expects.
Click “Done”

Bulk Tab
Cloud Elements supports bulk download of objects in JSON format if the endpoint support filter by date.
The following fields are required to enable bulk download:
Bulk Query Time Format: Select a time format from the dropdown list. The time format must match the endpoint’s supported time format for queries. Bulk Query Field Name: Provide an object and an operator in the Bulk Query Field Name, e.g. where orders >= “{time_format}”. Bulk Query Operator: The Bulk Query Operator can be set to “=” or “>=”.
Twitter supports a createat field. However, they do not support an updatedat field. Since the updated_at field is not supported, bulk download will occur on objects created since a certain day and time.
Let’s take a look at an example.
Partial JSON payload of Twitter GET /users resource:
[
  {
    "profile_sidebar_fill_color": "DDEEF6",
    "profile_background_tile": true,
    "profile_sidebar_border_color": "C0DEED",
    "name": "Twitter API",
///////////////////////////////////////////////////////
////"created_at": "Wed May 23 06:01:13 +0000 2007",////
///////////////////////////////////////////////////////
    "profile_image_url":
    ...
  }
]
We’ll be using the created_at field in the Bulk Query Field Name below.
In the Bulk Query Field Name, input
created_atSelect the Bulk Query Date Format, the format the endpoint expects. This can be found in the endpoint API documentation.
Input a Bulk Query Operator. The Bulk Query Operator can be set to
=or>=.Click “Done”

Documentation Tab
View the newly created API documentation for Element. Try out the API calls right from Element Builder.
View the new Element documentation by selecting an instance from the dropdown: “Change Instances”.

If an instance has not been created, click “Add Instance”.

Try It Out: Click on a resource, e.g. GET /users
Input the query parameter: q=’jonsmith’
Click “Try it out!”

View the response.

Click “Done”

Admin Dashboard
Within the in Admin Dashboard, the following functions are available to exercise on all Elements created using Element Builder:
- Edit an Element: change a URL, add a resource, edit configurations
- Deactivate: deactivates an Element, temporarily removing it from the catalog
- Delete: deletes an Element, permanently removing it from the catalog
- Export: exports Element JSON, this JSON can be imported at a later time
To access the Element admin functions, click on the gear.
To import Element JSON, click “Import Element” and follow the prompts. All functionality will be available based on the last state of the Element prior to export.

Support
Element Builder is currently in BETA. We would love to hear about enhancements or concerns regarding the application. Please don’t hesitate to get in touch.
Need some help? Don’t hesitate to reach out to Cloud Elements Support with any questions or concerns.
The Cloud Elements Team