The docs are moving!
Find us at our new Help Center where we've combined our documentation and knowledgebase articles in one easy-to-search location.
We aren't updating the Developer Portal anymore, except for the Element Docs — all updates happen in the Help Center. We're retiring the Developer Portal as you know it in:
Account Usage and Management Guide
Accounts and Account-level Users provide a way within Cloud Elements to organize a group of related Element Instances together. Conceptually, you can think of an account as a way to organize Element Instances for “Your Customer”.
You will need a Cloud Elements Login in order to call our APIs. If you do not have a login, the first step is to sign up. It’s free! Instructions are below
SIGNUP FOR THE CLOUD ELEMENTS SERVICE
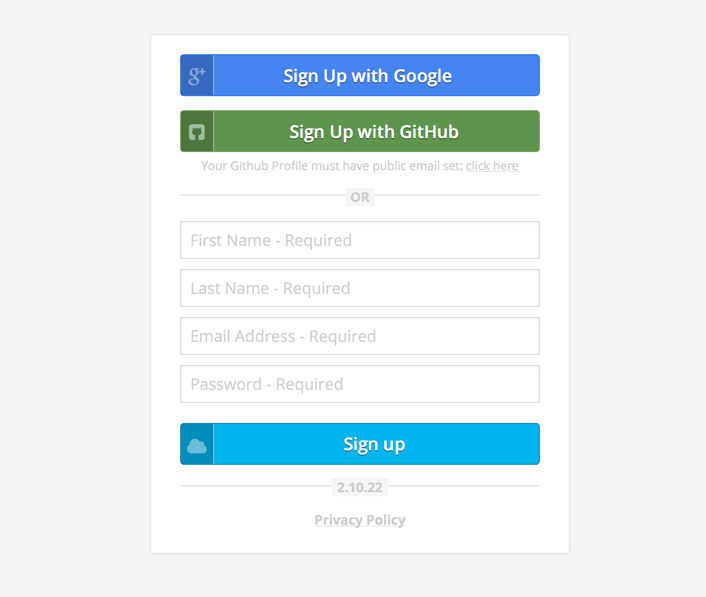
To sign up for the Cloud Elements service, using a web browser, go to: https://console.cloud-elements.com/elements/jsp/signup.jsp.
You can create a new account with Cloud Elements using your Google or GitHub Account. Or fill out a few fields and click “Sign up”. When signing up via GitHub, you must set a public email address in GitHub profile. Screen shots on how to set a public email are below. If you choose not to use Google or GitHub to sign up, you will then be required to validate your new account via a confirmation link that will be sent to your email. You will reset your password to one of your choice after your initial login.
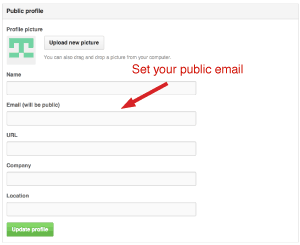
Setting a Public Email in GitHub
Navigate to your settings in GitHub.

Type in your public email in the designated field and click “Update Profile”.
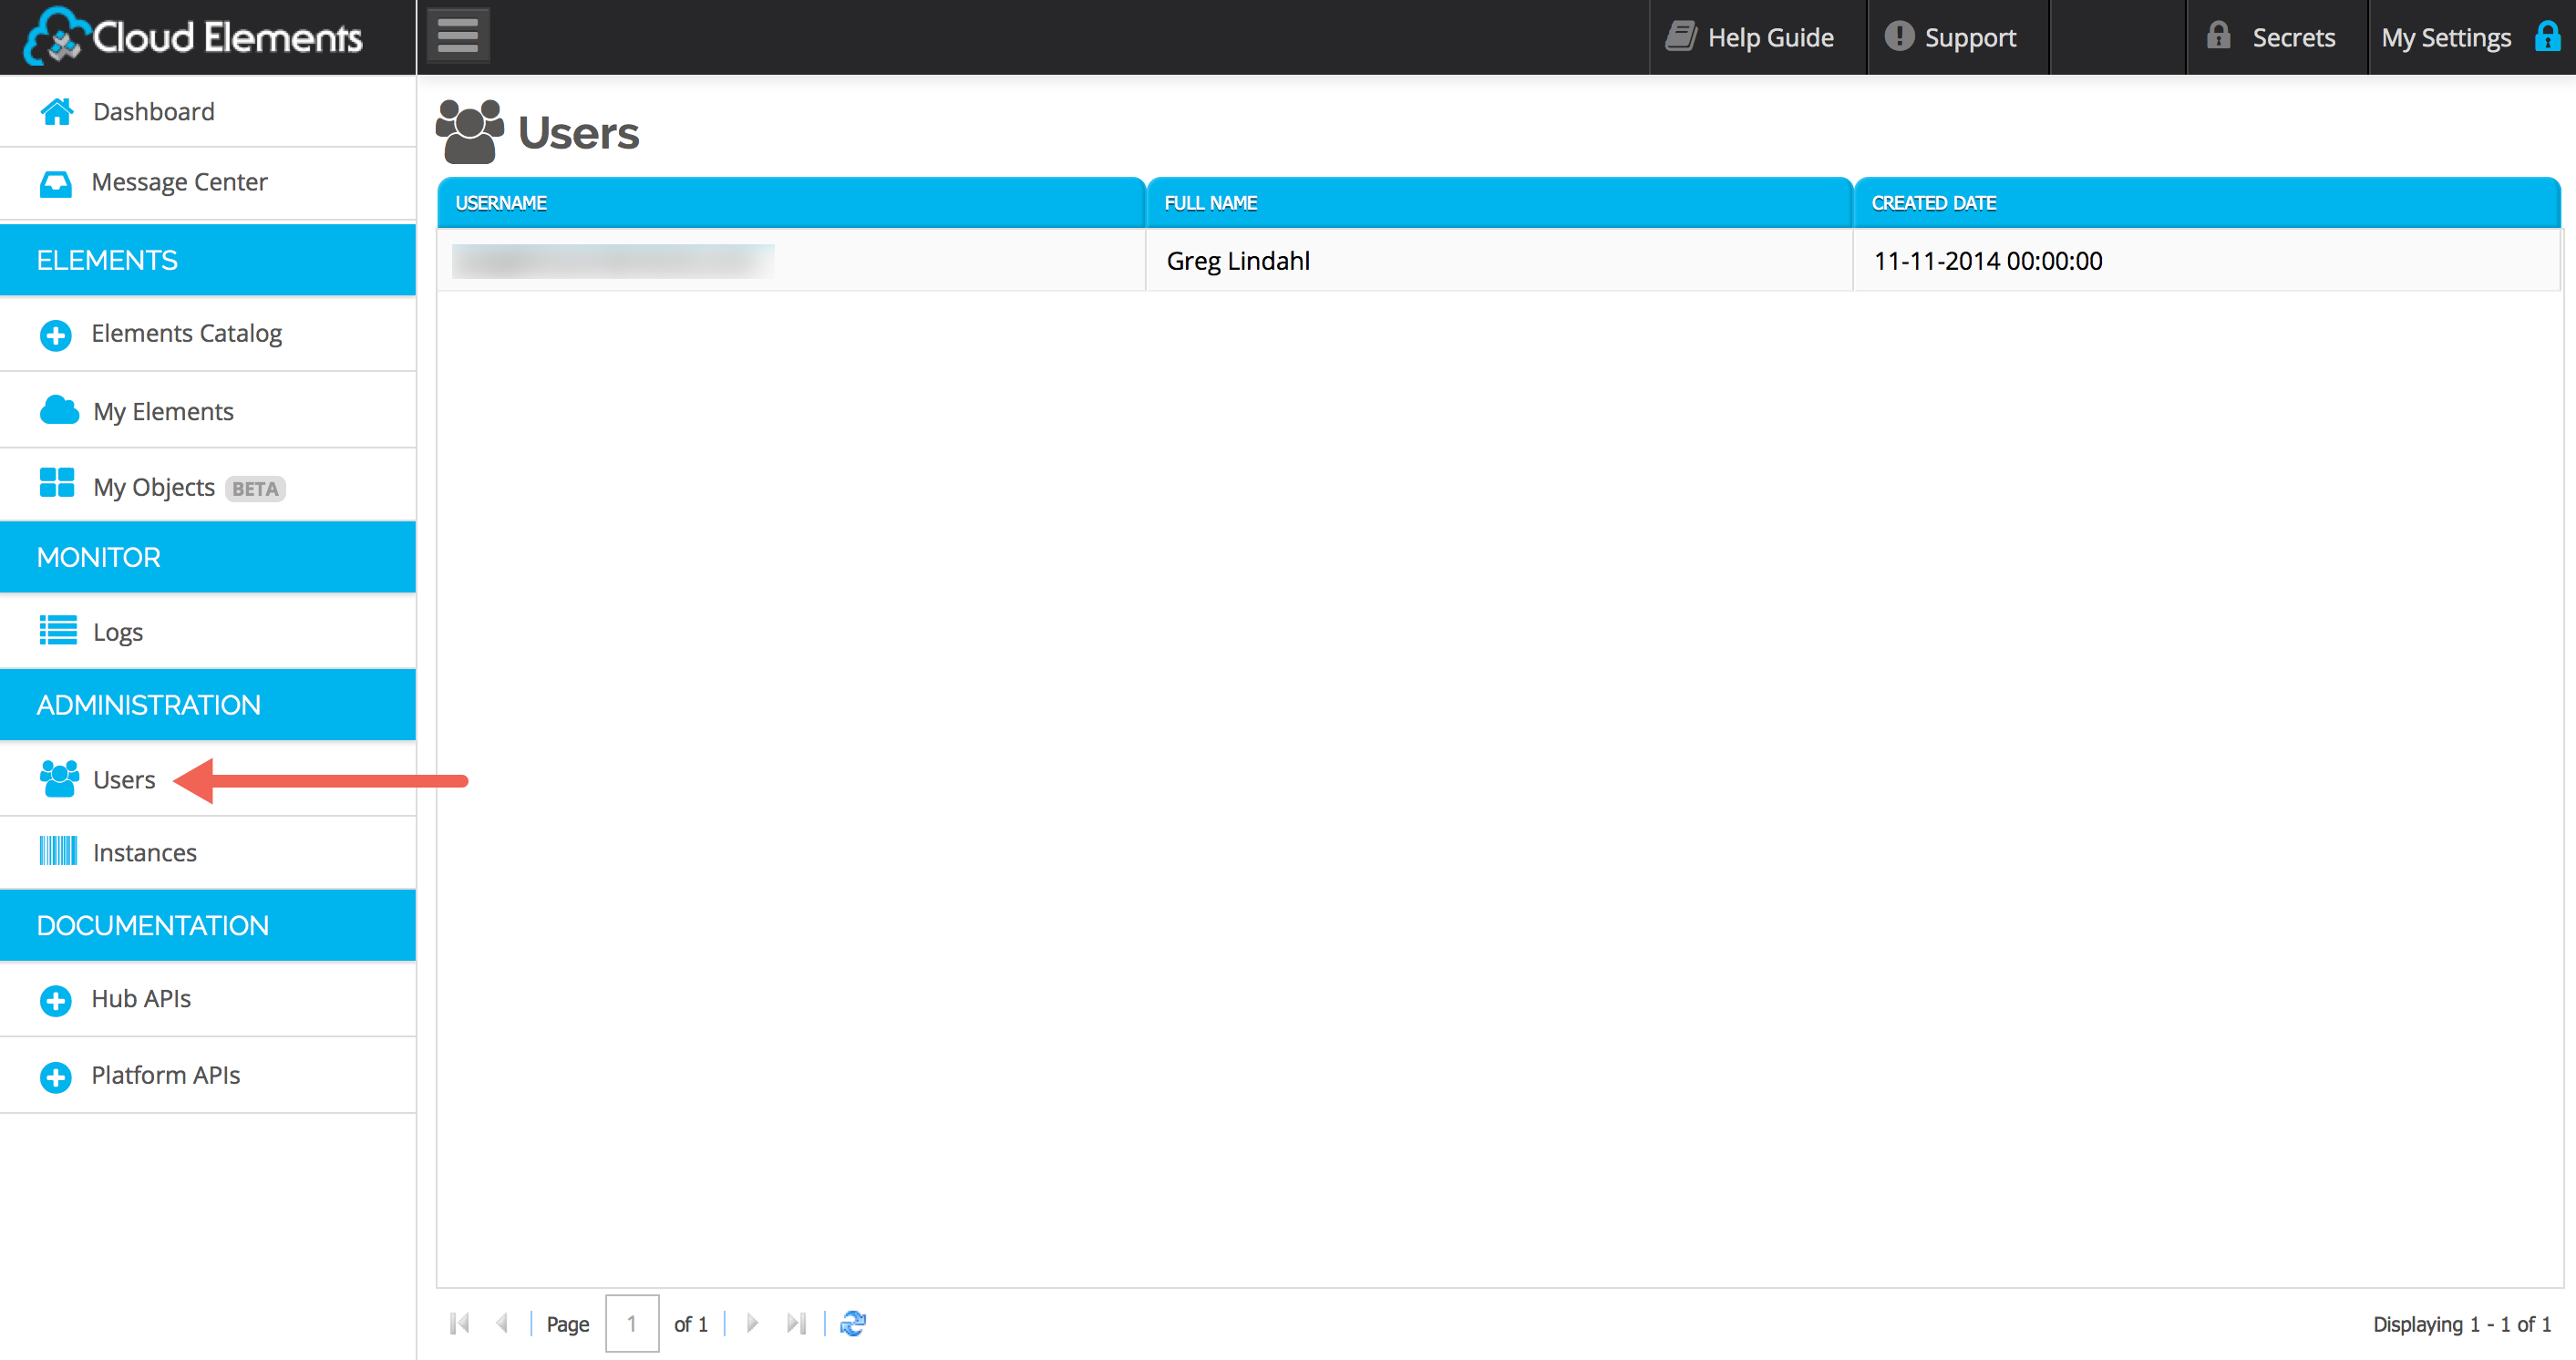
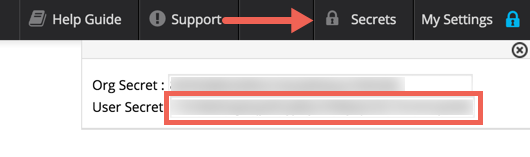
After completing this process, click “Secrets” in the top right corner. Make note of the Org and User secrets as they needed to provision an Element Instance. The Secrets option is available from the top ribbon at all times.

How To Use the Accounts APIs
When you sign up for Cloud Elements, by default an Organization-level user is created, and a Default Account is created for you. All Elements provisioned by the Organization-level user associate to this Default Account.
The Organization-level user is the same as the User ID you signed up with, and is the only User ID you will see in your Administration -> Users screen until you provision other users into your environment:
Adding An Account
Let’s say you have a customer, “Acme Publishing”, and you wish to organize all Element Instances provisioned by your App, within this Account. Or perhaps, you wish to add additional developer logins to your Cloud Elements Organization, and allow them to login using their own credentials, and manage his or her own dev/testing Instances.
To accomplish these goals, you need to add an Account and an Account User, within your Cloud Elements Organization/Environment. Presently, the only way to do this is via the API. Here’s how:
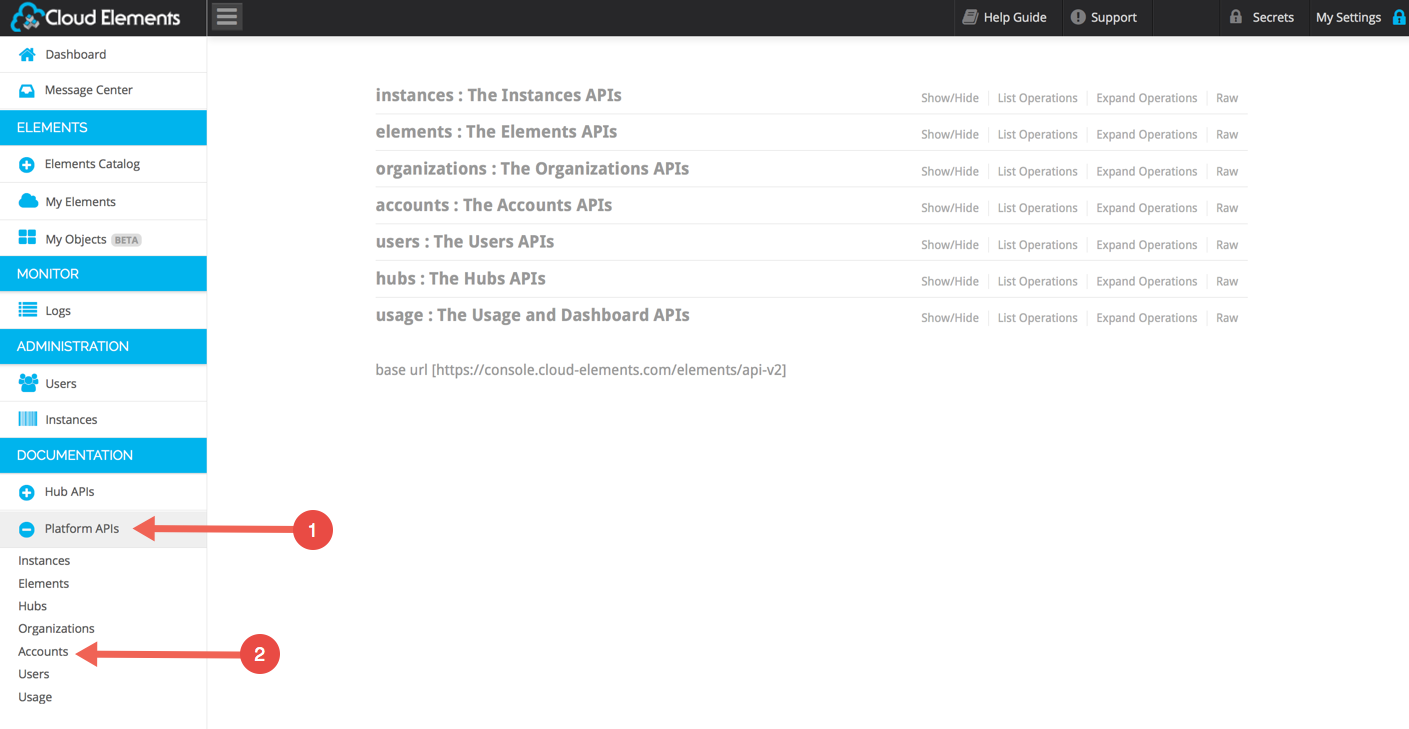
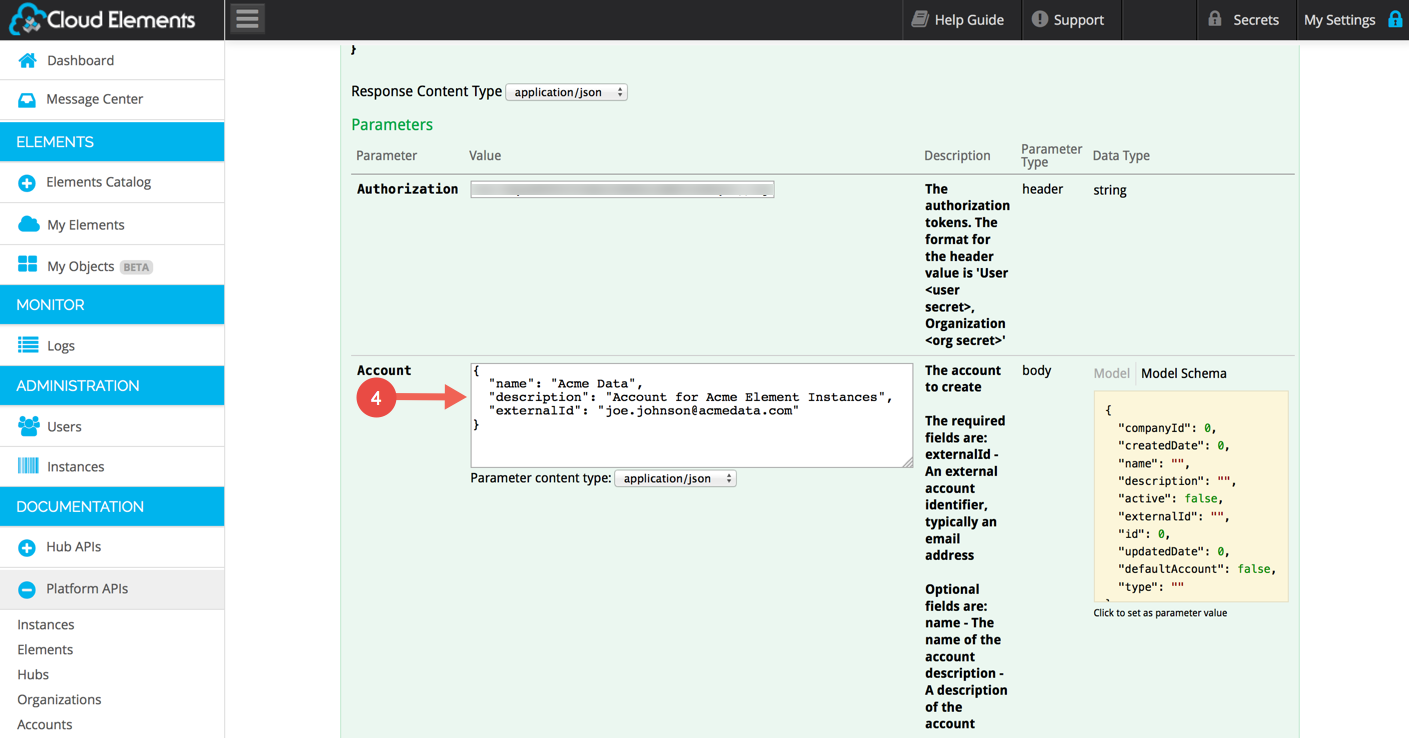
In Cloud Elements, open API Docs > Platform > Accounts:
Expand the POST /accounts section:

Prepare your Provisioning JSON. This example shows the needed fields:
{
  "name": "Acme Data",
  "description": "Account for Acme Element Instances",
  "externalId": "joe.johnson@acmedata.com"
}
externalId (in this example, joe.johnson@acmedata.com) corresponds to the email address of the Account-level User you wish to associate to this Account.
Paste the Account JSON into the Account text box:
Scroll down and Click the “Try it out” button:
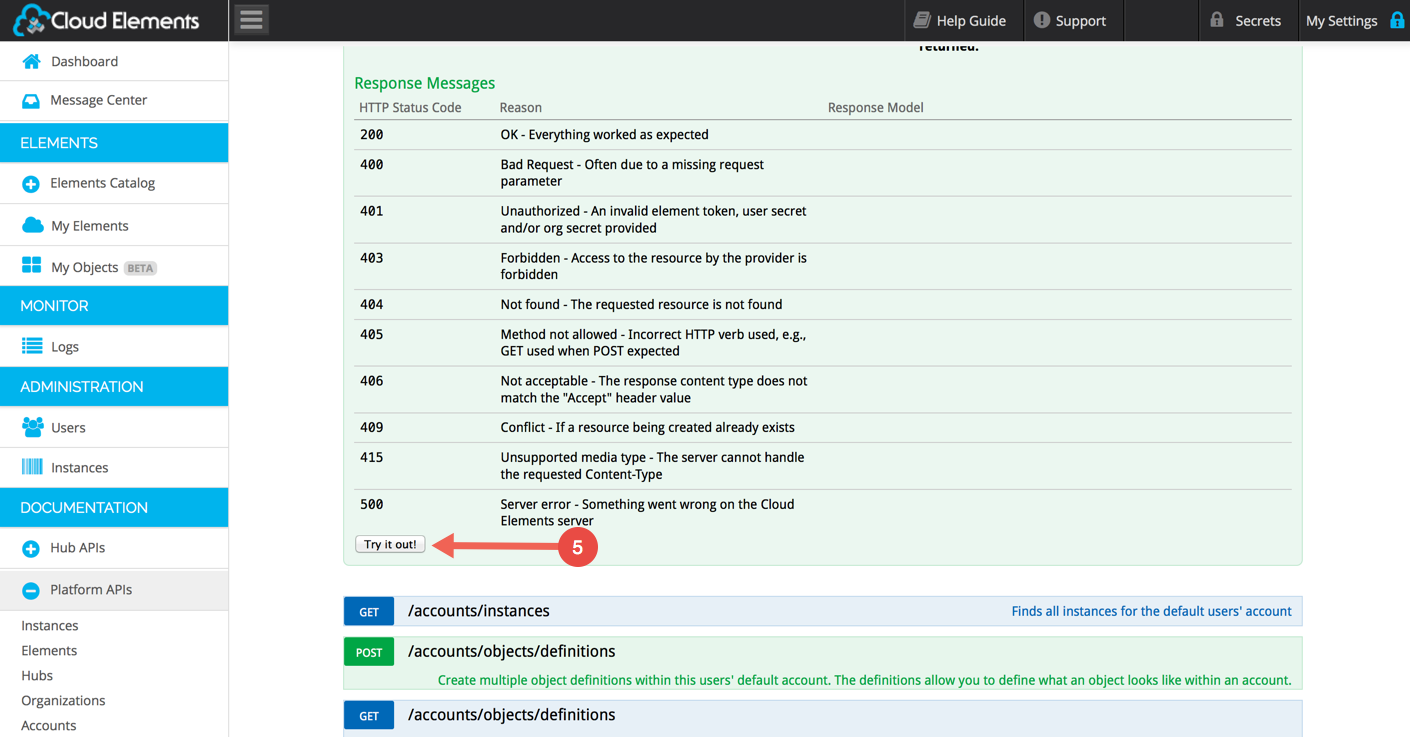
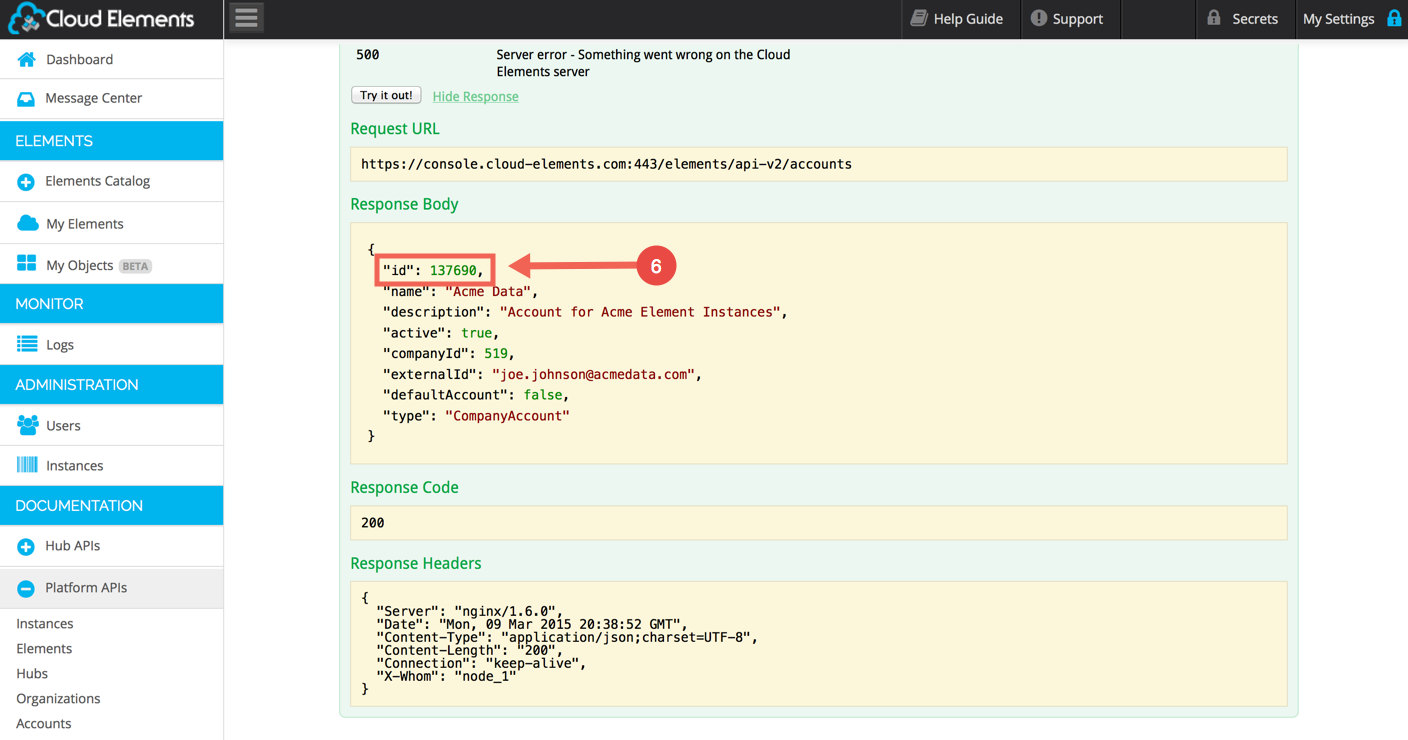
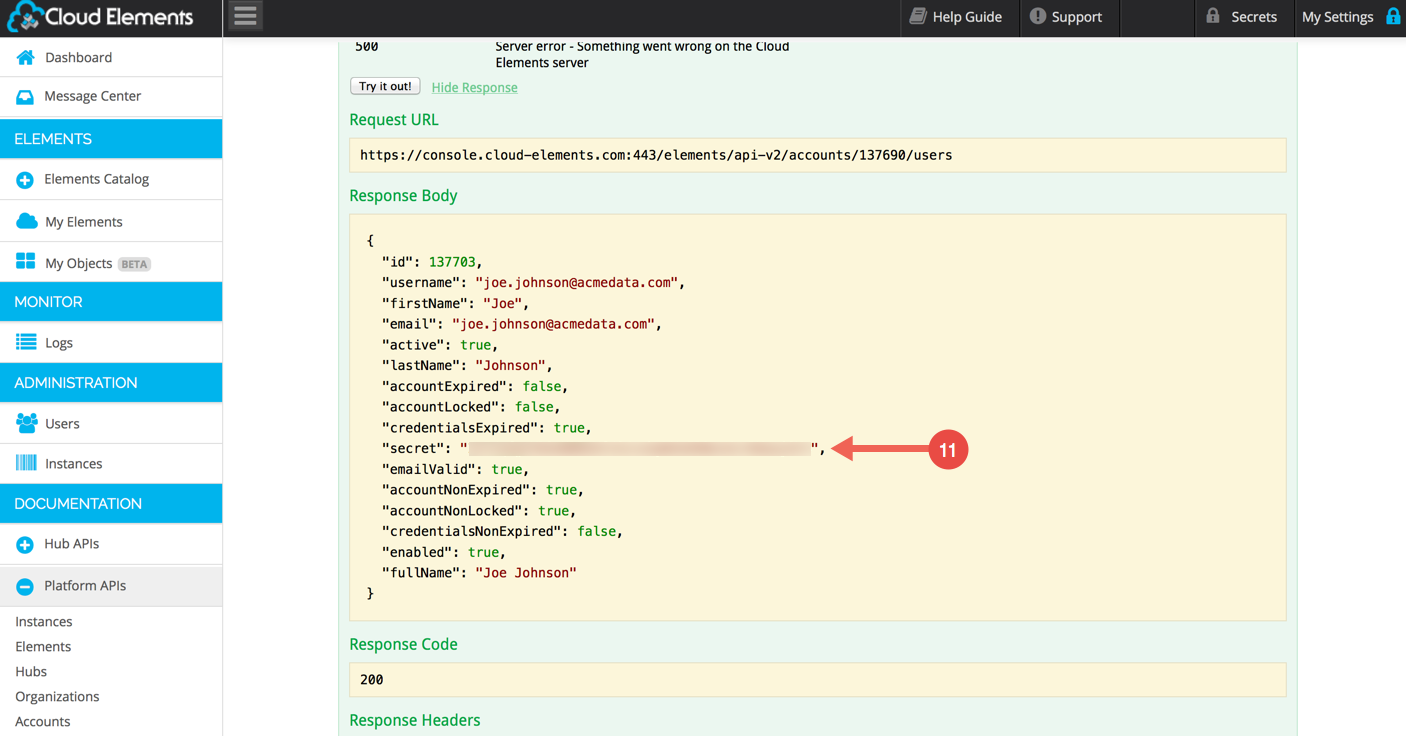
A successful POST will show Response JSON similar to left:
Make note of the id: 137690 for our Example. This is the Account ID of the new Account. You’ll need it to provision a User that associates to this Account.
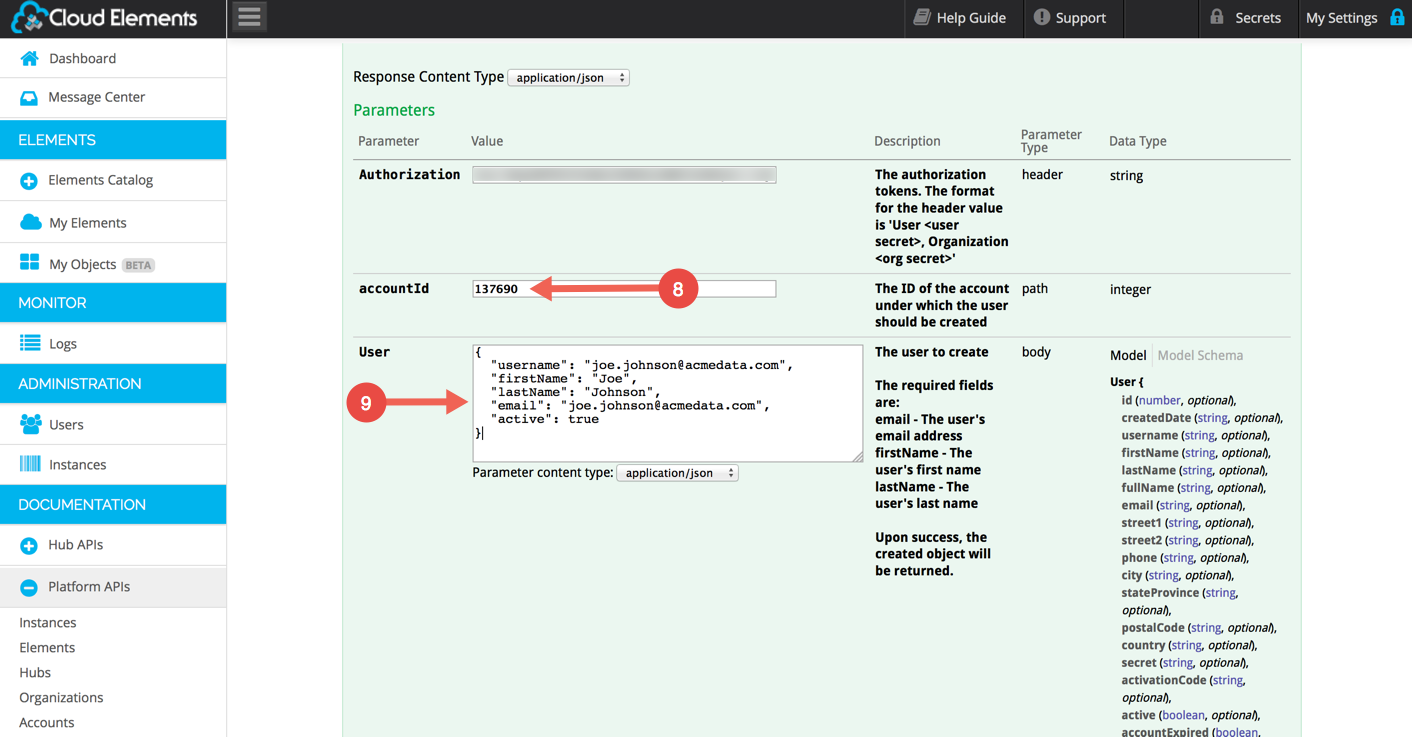
Go to the POST /accounts/{accountId}/users section:

Scroll to the User JSON Body section. First, paste the AccountID returned by your Account provisioning step above into the accountId field:
Prepare your User Provisioning JSON (recommended simple version below):
{
  "username": "joe.johnson@acmedata.com",
  "firstName": "Joe",
  "lastName": "Johnson",
  "email": "joe.johnson@acmedata.com",
  "active": true
}
Scroll down and click the “Try It Out” button.

A successful response will be shown in the JSON body:
Important: Record/store the value of “secret” in the Response JSON! This is especially important if you are automating the provisioning workflow, and don’t intend for the account-level user to be able to login. For security reasons the secret is never returned by a follow-up call to GET /users/{userId}.
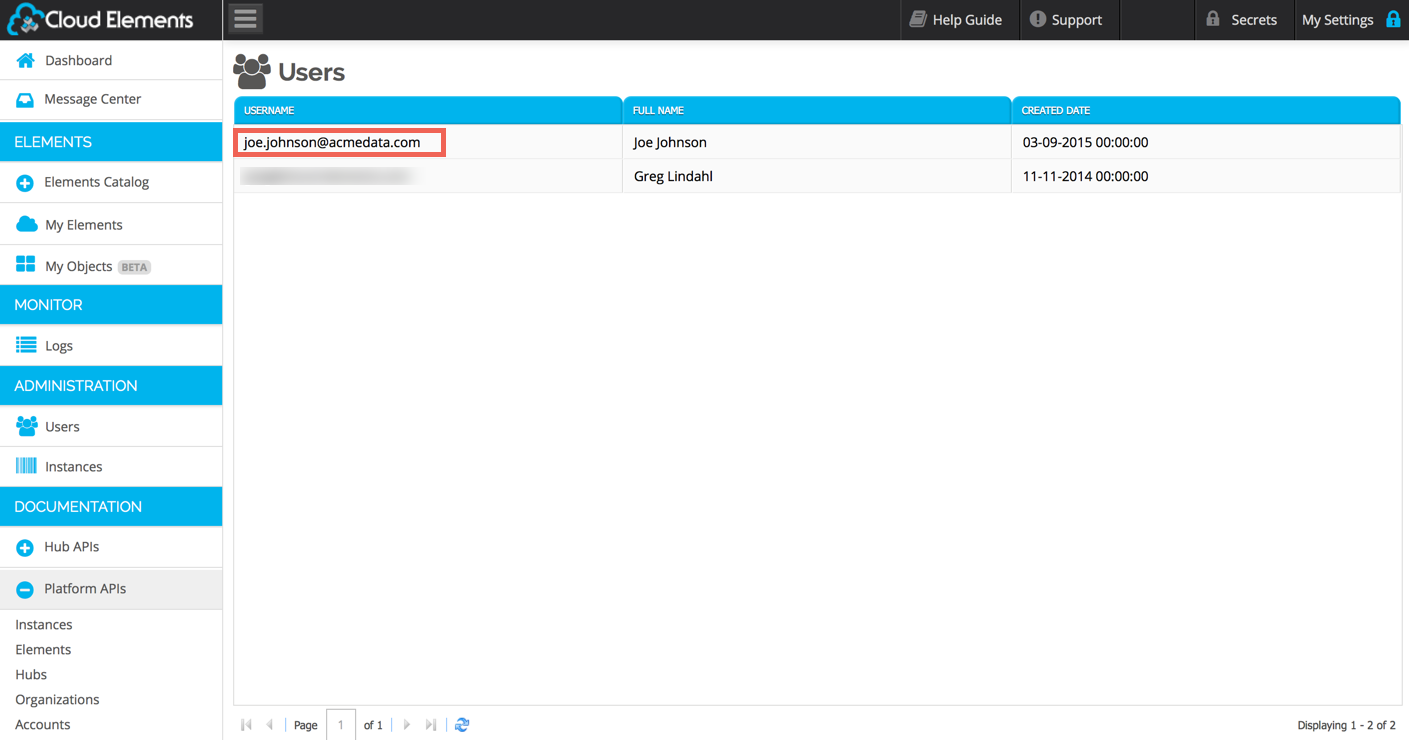
This user will then show up in the Administration -> Users section when logged in as the primary Organization User:
The User Token returned from the POST JSON body response is sufficient to go ahead and make API calls, etc.
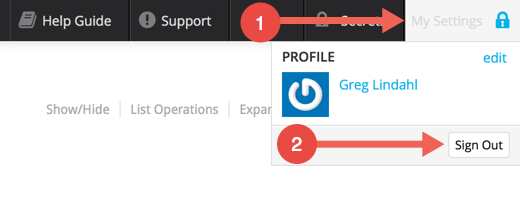
If you wish for the user to be able to interactively login to the console, however, you’ll need to initiate a password reset email. Log out from Cloud Elements:
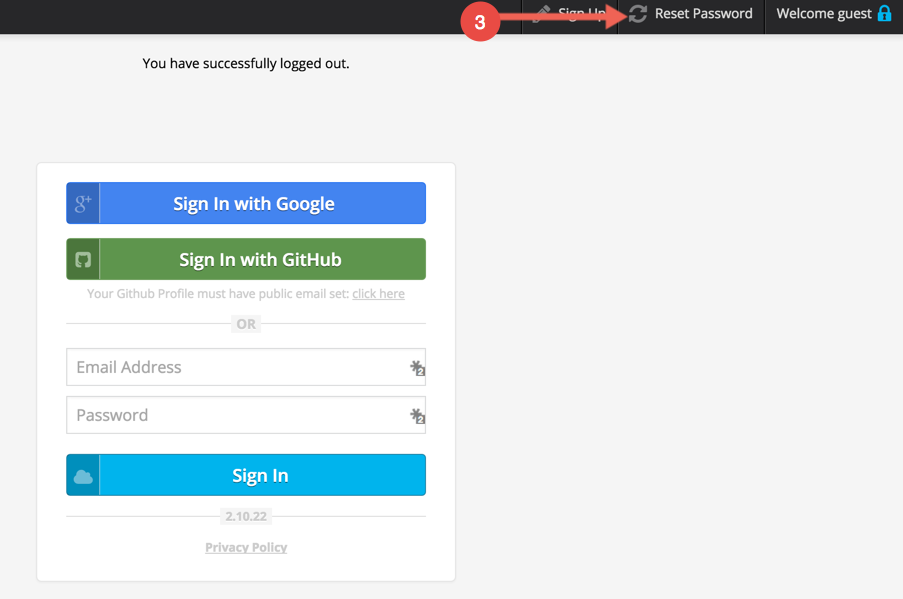
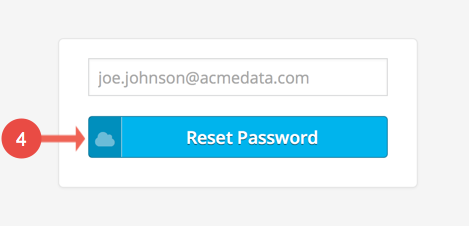
Click the “Reset Password” button:
Enter the User ID of the new Account-level user into the User field, and click “Reset Password”:
The new User will receive their initial Password via email. It is a good idea for them to change it after their first login for security reasons.
When the Account-level user logs in, you will notice that they do not have the “Administration” section of the console accessible to them (i.e. they have more limited permissions)
You’ll also note that the Account-level user cannot see the provisioned Element Instances of the Default Org-level user, or, other Account-level users:
The Account-level user will only be able to see, use, and Administer Element Instances that he or she has provisioned.
To create Account-level Instances via the API, Provision them using the User secret of the Account-level User:
Account creation instructions via API can be seen in the next section.
Create Accounts via API
POST /accounts
Create an account within your organization (identified by your organization secret). The provided user secret must be that of the default admin user for the organization.
This API call requires a JSON file with the required data to create your account. An example JSON file can be found below along with an example response from the API call.
create-account.json – these fields are required in your JSON file. This data can also be passed in directly into the cURL command. This method will be shown in the Example API Calls section of this documentation.
{
 "name": "<Name of the Account>",
 "description": "<Description of the Account>",
 "externalId": "<ID of the Account>"
}
Example of Successful Response – data returned in JSON format
{
 "companyId": <The ID of the organization that owns the account>,
 "name": "<The name of the account>",
 "description": "<The description of the account>",
 "externalId": "<The external ID of the Account>",
 "id": <The CE assigned ID of the Account>
}
Below is an example cURL command demonstrating the API call and response with example data.
POST /accounts
curl -X POST
-H 'Authorization: User <INSERT_USER_SECRET>, Organization <INSERT_ORGANIZATION_SECRET>'
-H 'Content-Type: application/json'
-d @create-account.json
'https://api.cloud-elements.com/elements/api-v2/accounts'
create-account.json
{
 "name": "Acme Data Services",
 "description": "The Acme Data Services Account",
 "externalId": "brie@acmedataservices.com"
}
Example of Successful Response
{
 "companyId": 6523,
 "name": "Acme Data Services",
 "description": "The Acme Data Services Account",
 "externalId": "acmedataservices.com",
 "id": 8341
}
After successful creation of the account. You may now add users to that account. Below are examples of how to create a new user for the newly created account.
POST /accounts/{id}/users
Create a new user for the newly created account.
This API call requires a JSON file with the required data to create your user. An example JSON file can be found below along with an example response from the API call.
create-account-user.json – JSON file needed to create user.
{
   "email": "<The user's email address>",
   "firstName": "<The user's first name>",
   "lastName": "<The user's last name>"
}
Example of Successful Response – object returned from the API call
{
   "id": <The CE ID for the user>,
   "email": "<The user's email address>",
   "firstName": "<The user's first name>",
   "lastName": "<The user's last name>",
   "secret": "<The user's secret>"
}
Below is an example cURL command demonstrating the API call and response with example data.
POST /accounts/{id}/users
curl -X POST
-H 'Authorization: User <INSERT_USER_SECRET>, Organization <INSERT_ORGANIZATION_SECRET>'
-H 'Content-Type: application/json'
-d @create-account-user.json
'https://api.cloud-elements.com/elements/api-v2/accounts/{id}/users'
create-account-user.json
{
   "email": "brie@acmedataservices.com",
   "firstName": "Brie",
   "lastName": "Burns"
}
Example of Successful Response – object returned from the API call
{
   "id": 12802,
   "email": "brie@acmedataservices.com",
   "firstName": "Brie",
   "lastName": "Burns",
   "secret": "KHh2387n2hk34/979283u012="
}
NOTE: There may be other fields in the Response JSON.
To provision Elements, use your Organization secret and the User Secret of the newly created account user. The provisioning flow will be the same using the /instances API. Element Provisioning is covered in the Create Instance section further down in this document.
The Multiple Users and Accounts workflow gives you the flexibility to create instances for specific accounts. For example, if you wanted to create an instance for one of your customers, then you would create an account for that customer first. After the account has been successfully created for that customer, you may create individual users, and Element instances for those users under the newly created account, using your own Organization secret and your customer’s new User secret.
All APIs require a valid Organization and User secret to be on the HTTP header. Failure to pass these will result in a 401 exception. For all Accounts API operations, if the provided user does not belong to the default account of the organization, then a 401 error is returned.
The Accounts APIs provide create, retrieve, update, delete and search functionality for accounts. The Accounts APIs can be accessed via the https://api.cloud-elements.com/elements/api-v2/accounts URL pattern.
Below are examples of Accounts API calls and successful responses.
POST /accounts
Create an account within the organization. A request body defining the account to create is required.
The required fields are: externalId – An external account identifier, typically an email address
Optional fields are: name – The name of the account description – A description of the account
Upon success, the created object will be returned.
Below is an example cURL command demonstrating the POST /accounts API call and successful response. The -d is the data needed for successful account creation. This is test data that was created for this demonstration. Please make sure your quotes are straight in the cURL command.
curl -X POST
-H 'Authorization: User <INSERT_USER_SECRET>, Organization <INSERT_ORGANIZATION_SECRET>'
-H 'Content-Type: application/json'
-d '{
  "externalId": "test@company.com",
  "name": "test_account",
  "description": "A test account for an example organization."
}'
'https://api.cloud-elements.com/elements/api-v2/accounts'
Example of Successful Response
{
    "id": 14,
    "name": "test_account",
    "description": "A test account for an example organization.",
    "active": true,
    "createdDate": "2014-08-19",
    "externalId": "test@company.com",
    "defaultAccount": false,
    "type": "CompanyAccount"
}
GET /accounts
Find accounts within the organization using a CEQL query.
Optional query parameters: where – The CEQL search expression is a where clause, without the WHERE keyword, in a typical SQL query. For example, to search for accounts created on or after ‘Jan 15, 2014′, the search expression will be where=createdDate >= ‘2014-01-15′. When this parameter is omitted, all accounts are returned in a paginated fashion.
offset – The record offset at which to begin the paginated results, defaults to 0.
pageSize – The page size for the paginated results, defaults to 200.
Pagination metadata will be returned in totalCount and returnedCount headers.
Below is an example cURL command demonstrating the GET /accounts API call and successful response. Please make sure your quotes are straight in the cURL command.
curl -X GET
-H 'Authorization: User <INSERT_USER_SECRET>, Organization <INSERT_ORGANIZATION_SECRET>'
'https://api.cloud-elements.com/elements/api-v2/accounts?where=createdDate%20>%20%272014-08-01%27'
Example of Successful Response:
[
    {
        "id": 3,
        "name": "Example Organization's  Company Default Account",
        "description": "Auto created default account for the entire company",
        "active": true,
        "createdDate": "2014-08-19",
        "externalId": "default@company.com",
        "defaultAccount": true,
        "type": "Default"
    },
    {
        "id": 14,
        "name": "test_account",
        "description": "A test account for an example organization.",
        "active": true,
        "createdDate": "2014-08-19",
        "externalId": "test@company.com",
        "defaultAccount": false,
        "type": "CompanyAccount"
    }
]
PATCH /accounts/{id}
Update an account within the organization. A request body defining the updated account information is required.
The fields that can be updated are: externalId – An external account identifier, typically an email address
name – The name of the account
description – A description of the account
Upon success, the updated object will be returned.
Below is an example cURL command demonstrating the PATCH /accounts/{id} API call and successful response. The -d is the data needed for a successful update of an account. This is test data that was created for this demonstration. Please make sure your quotes are straight in the cURL command.
curl -X PATCH
-H 'Authorization: User <INSERT_USER_SECRET>, Organization <INSERT_ORGANIZATION_SECRET>'
-H 'Content-Type: application/json'
-d '{
  "name": "updated_test_account",
  "description": "An updated test account for an example organization."
}'
'https://api.cloud-elements.com/elements/api-v2/accounts/14'
Example of Successful Response:
{
    "id": 14,
    "name": "updated_test_account",
    "description": "An updated test account for an example organization.",
    "active": true,
    "createdDate": "2014-08-19",
    "externalId": "test@company.com",
    "defaultAccount": false,
    "type": "CompanyAccount"
}
DELETE /accounts/{id}
Delete an account within the organization.
Below is an example cURL command demonstrating the DELETE /accounts/{id} API call and successful response. The ID needs to be placed at the end of the URL. 14 is the ID of the example account. It can be seen at the end of URL in the cURL command below. Please make sure your quotes are straight in the cURL command.
curl -X DELETE
-H 'Authorization: User <INSERT_USER_SECRET>, Organization <INSERT_ORGANIZATION_SECRET>'
'https://api.cloud-elements.com/elements/api-v2/accounts/14'
Example of Successful Response:
HTTP 200 on success
GET /accounts/{id}
Retrieve an account within the organization.
Below is an example cURL command demonstrating the GET /accounts/{id} API call and successful response. The ID needs to be placed at the end of the URL. 14 is the ID of the example account. It can be seen at the end of URL in the cURL command below. Please make sure your quotes are straight in the cURL command.
curl -X GET
-H 'Authorization: User <INSERT_USER_SECRET>, Organization <INSERT_ORGANIZATION_SECRET>'
'https://api.cloud-elements.com/elements/api-v2/accounts/14'
Example of Successful Response:
{
    "id": 14,
    "name": "test_account",
    "description": "A test account for an example organization.",
    "active": true,
    "createdDate": "2014-08-19",
    "externalId": "test@company.com",
    "defaultAccount": false,
    "type": "CompanyAccount"
}
After successful creation of the account. You may now add users to that account. Below are examples of how to create a new user for the newly created account.
POST /accounts/{id}/users
Create a new user for the newly created account.
This API call requires JSON formatted with the correct data to be passed in order to create your user. Example JSON can be found below along with an example response from the API call. Please make sure all of your quotes are straight in the cURL command.
The {id} in the URL is the ID of the account under which the new user will be added. Here is the URL with the {id} notated in curly brackets:
https://api.cloud-elements.com/elements/api-v2/accounts/{id}/users
curl -X POST 'https://api.cloud-elements.com/elements/api-v2/accounts/{id}/users'
-H 'Authorization: User <INSERT_USER_SECRET>, Organization <INSERT_ORGANIATION_SECRET>'
-H 'Content-Type: application/json'
-d '{
   "email": "<emailAddress>",
   "firstName": "<firstName>",
   "lastName": "<lastName>"
}'
Example of the cURL command with an actual ID in the call. The ID of 14 is from the POST /accounts call in the previous section. The -d has the minimum required JSON data needed to create a new user. This data can also be saved in a .json file. The cURL command would notate the path to that .json file.
curl -X POST 'https://api.cloud-elements.com/elements/api-v2/accounts/14/users'
-H 'Authorization: User <INSERT_USER_SECRET>, Organization <INSERT_ORGANIATION_SECRET>'
-H 'Content-Type: application/json'
-d '{
   "email": "brie@acmedataservices.com",
   "firstName": "Brie",
   "lastName": "Burns"
}'
Example of Successful Response:
{
  "id": 13404,
  "name": "OBJECT-SOBAUSER",
  "firstName": "Brie",
  "email": "brie@acmedataservices.com",
  "active": true,
  "lastName": "Burns",
  "accountExpired": false,
  "accountLocked": false,
  "credentialsExpired": true,
  "secret": "koZOU/KsYvfpigjyPe8nR0+KPJzMAB9dRmJKxWXF3XY=",
  "accountNonExpired": true,
  "accountNonLocked": true,
  "credentialsNonExpired": false,
  "emailValid": true,
  "enabled": true,
  "fullName": "Brie Burns"
}
NOTE: The new user Brie has been assigned an ID of 13404. This ID can be found in the top field of the JSON response. This ID will be needed along with the account ID for the
GET /accounts/{accountId}/users,
GET /accounts/{accountId}/users/{emailOrId:.+}, and the
PATCH /accounts/{accountId}/users/{id}.
GET /accounts/{accountId}/users
Retrieve users within the indicated account.
Below is an example of the GET /accounts/{accountId}/users and an example of a successful response. The URL contains the ID 14, this is the account ID assigned upon the successful creation of the account object. This call will retrieve all users under the account ID. In the example below, all users under the account ID of 14 will be returned.
curl -X GET
-H 'Authorization: User <INSERT_USER_SECRET>, Organization <INSERT_ORGANIATION_SECRET>'
'https://api.cloud-elements.com/elements/api-v2/accounts/14/users'
Example of Successful Response:
[
  {
    "id": 132,
    "name": "OBJECT-SOBAUSER",
    "createdDate": "2014-08-29",
    "username": "brie@acmedataservices.com",
    "firstName": "Brie",
    "email": "brie@acmedataservices.com",
    "active": true,
    "lastName": "Burns",
    "accountExpired": false,
    "accountLocked": false,
    "credentialsExpired": false,
    "accountNonExpired": true,
    "accountNonLocked": true,
    "credentialsNonExpired": true,
    "emailValid": true,
    "enabled": true,
    "fullName": "Brie Burns"
  },
  {
    "id": 143,
    "name": "OBJECT-SOBAUSER",
    "createdDate": "2014-08-29",
    "username": "jon@acmedataservices.com",
    "firstName": "Jon",
    "email": "jon@acmedataservices.com",
    "active": true,
    "lastName": "Smith",
    "accountExpired": false,
    "accountLocked": false,
    "credentialsExpired": true,
    "accountNonExpired": true,
    "accountNonLocked": true,
    "credentialsNonExpired": false,
    "emailValid": true,
    "enabled": true,
    "fullName": "Jon Smith"
  }
]
GET /accounts/{accountId}/users/{emailOrId:.+}
Retrieve an account user by name or ID
Below is an example of the GET /accounts/{accountId}/users/{emailOrId:.+} and an example of a successful response. The URL contains the ID 14, this is the account ID assigned upon the successful creation of the account object. This call will retrieve a user associated with an ID or email address under the account ID. In the example below, a user with the email address jon@acmedataservices.com under the account ID of 14 will be returned. The GET /accounts/{accountId}/users/{email} will be shown first. The GET /accounts/{accountId}/users/{id} will be shown in the second example.
curl -X GET
-H 'Authorization: User <INSERT_USER_SECRET>, Organization <INSERT_ORGANIATION_SECRET>'
"https://api.cloud-elements.com/elements/api-v2/accounts/14/users/'brie@acmedataservices.com'"
Example of Successful Response:
{
  "id": 143,
  "name": "OBJECT-SOBAUSER",
  "createdDate": "2014-08-29",
  "username": "jon@acmedataservices.com",
  "firstName": "Jon",
  "email": "jon@acmedataservices.com",
  "active": true,
  "lastName": "Smith",
  "accountExpired": false,
  "accountLocked": false,
  "credentialsExpired": false,
  "secret": "c9MA7VNy6D7kxFcy8qlU7AbKbrHLJ4wsWvuKkFVo2zk=",
  "accountNonExpired": true,
  "accountNonLocked": true,
  "credentialsNonExpired": true,
  "emailValid": true,
  "enabled": true,
  "fullName": "Jon Smith"
}
In the example below, the user with the ID of 143 under the account ID of 14 will be returned.
curl -X GET
-H 'Authorization: User <INSERT_USER_SECRET>, Organization <INSERT_ORGANIATION_SECRET>'
'https://api.cloud-elements.com/elements/api-v2/accounts/14/users/143'
Example of Successful Response:
{
  "id": 143,
  "name": "OBJECT-SOBAUSER",
  "createdDate": "2014-08-29",
  "username": "jon@acmedataservices.com",
  "firstName": "Jon",
  "email": "jon@acmedataservices.com",
  "active": true,
  "lastName": "Smith",
  "accountExpired": false,
  "accountLocked": false,
  "credentialsExpired": false,
  "secret": "c9MA7VNy6D7kxFcy8qlKkFVo2zk=",
  "accountNonExpired": true,
  "accountNonLocked": true,
  "credentialsNonExpired": true,
  "emailValid": true,
  "enabled": true,
  "fullName": "Jon Smith"
}
PATCH /accounts/{accountId}/users/{id}
Update an account user
Below is an example of the PATCH /accounts/{accountId}/users/{id} and an example of a successful response. The URL contains the ID 14, this is the account ID assigned upon the successful creation of the account object. This call will update the user associated with a user ID under the account ID. In the example below, a user with an ID of 143 under the account ID of 14 will be updated.
curl -X PATCH
-H 'Authorization: User <INSERT_USER_SECRET>, Organization <INSERT_ORGANIATION_SECRET>'
-H 'Content-Type: application/json'
-d '{
  "email": "jane@acmedataservices.com",
  "firstName": "Jane",
  "lastName": "Smith"
}'
'https://api.cloud-elements.com/elements/api-v2/accounts/14/users/143'
Example of Successful Response:
{
  "id": 143,
  "name": "OBJECT-SOBAUSER",
  "firstName": "Jane",
  "email": "jane@acmedataservices.com",
  "active": true,
  "lastName": "Smith",
  "accountExpired": false,
  "accountLocked": false,
  "credentialsExpired": true,
  "accountNonExpired": true,
  "accountNonLocked": true,
  "credentialsNonExpired": false,
  "emailValid": true,
  "enabled": true,
  "fullName": "Jane Smith"
}
Support
If you need any support integrating our APIs, please let us know. You can email or give us a call at +1.866.830.3456. We will do our best to get back to you within 24 hours. Your success is our success.