The docs are moving!
Find us at our new Help Center where we've combined our documentation and knowledgebase articles in one easy-to-search location.
We aren't updating the Developer Portal anymore, except for the Element Docs — all updates happen in the Help Center. We're retiring the Developer Portal as you know it in:
Authenticate an Element Instance with Events
This section provides a summary of how to authenticate an element instance with events. Each element is different, so take a look at the Events section of the specific Element guide. You can authenticate via Cloud Elements or APIs. Use the UI/API switch at the top of this page to switch between UI or API steps.
Authenticate an Element Instance with Polling
Authenticating an element instance with events works the same as authenticating an instance, you just need to turn on events and set a few more parameters.
For more information about each field described here, see Parameters.
To authenticate an element instance with polling:
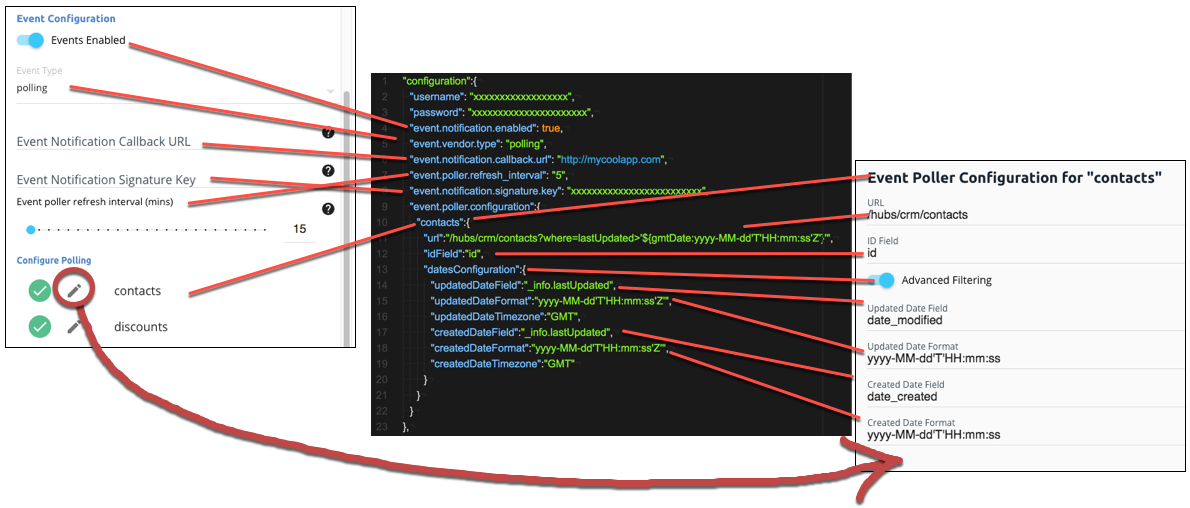
- Enter the Name of the element instance and any configuration parameters need to authenticate the element instance.
- To enable hash verification in the headers of event callbacks, click Show Optional Fields, and then add a key to Callback Notification Signature Key.
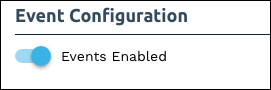
- Enable events: Switch Events Enabled on.
- If the element supports both polling and webhooks, select polling in Event Type.
- Add an Event Notification Callback URL to receive information about the events.
- Use the Event poller refresh interval (mins) slider or enter a number in minutes to specify how often Cloud Elements should poll for changes.
Click
 to select a resource to poll.
The code view on the right updates the
event.poller.configurationJSON object with the default polling configuration. You can change the polling configuration for each authenticated instance.Optionally, click
 to update the polling configuration, which appears in the Event Poller Configuration pane on the right.Note: The default polling configuration represents the optimal configuration. Although you can change anything in the poller configuration, we recommend that you do so rarely and in conjunction with Cloud Elements support.
In the Event Poller Configuration pane, you can update any of the fields, including the date fields under Advanced Filtering. After you make changes, click Save.
Your polling configuration is complete and you can authenticate the element instance. Use the events to build formulas to accomplish a wide variety of workflows.
Polling Parameters
Labels and buttons on the UI correspond to parameters in the JSON. The table below shows UI labels and buttons in bold and the equivalent parameters in the configuration JSON object in code formatting.
| Parameter | Description | Data Type |
|---|---|---|
Events Enabled event.notification.enabled |
Identifies that events are enabled for the element instance.Default: false. |
boolean |
Event Typeevent.vendor.type |
The type of event, either polling or webhook. |
string |
Event Notification Callback URLevent.notification.callback.url |
The URL where you want Cloud Elements to send the events. | string |
Event poller refresh interval (mins)event.poller.refresh_interval |
A number in minutes to identify how often the poller should check for changes. | number |
Callback Notification Signature Key event.notification.signature.key |
Optional. A user-defined key for added security to show that events have not been tampered with. | string |
Configure Pollingevent.poller.configuration |
Configuration parameters for polling. Tip: The default polling configuration represents the optimal configuration. Although you can change anything in the poller configuration, we recommend that you do so rarely and in conjunction with Cloud Elements support. |
JSON object |
Resource to Poll resourceName (e.g., contacts) |
The polling event configuration of the resource that you will monitor. | JSON object |
URLurl |
The url to query for updates to the resource. | String |
ID FieldidField |
The field in the resource that is used to uniquely identify it. | String |
Advanced FilteringdatesConfiguration |
Configuration parameters for dates in polling. | JSON Object |
Updated Date FieldupdatedDateField |
The field that identifies an updated object. | String |
Updated Date FormatupdatedDateFormat |
The date format of the field that identifies an updated object. | String |
Created Date FieldcreatedDateField |
The field that identifies a created object. | String |
Created Date FormatcreatedDateFormat |
The date format of the field that identifies a created object. | String |
Authenticate an Element Instance with Webhooks
Authenticating an element instance with events works the same as authenticating an instance, you just need to turn on events and set a few more parameters.
To authenticate an element instance with webhooks:
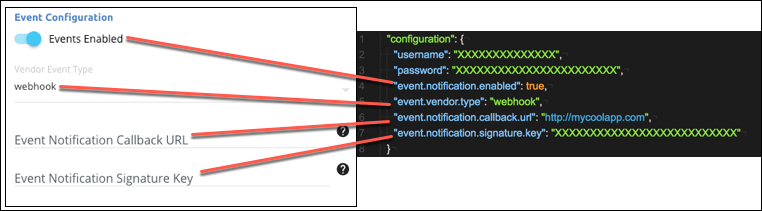
- Enter the Name of the element instance and any configuration parameters need to authenticate the element instance.
- To enable hash verification in the headers of event callbacks, click Show Optional Fields, and then add a key to Callback Notification Signature Key.
- Enable events: Switch Events Enabled on.
- If the element supports both polling and webhooks, select webhooks in Event Type.
Add an Event Notification Callback URL to receive information about the events.
Note: In most cases you must set up the event callback URL as part of API provider's webhook setup, and what you enter here should match.
Your webhooks configuration is complete and you can authenticate the element instance. Use the events to build formulas to accomplish a wide variety of workflows.
Webhook Parameters
Labels and buttons on the UI correspond to parameters in the JSON. The table below shows UI labels and buttons in bold and the equivalent parameters in the configuration JSON object in code formatting.
| Parameter | Description | Data Type |
|---|---|---|
Events Enabled event.notification.enabled |
Identifies that events are enabled for the element instance.Default: false. |
boolean |
Event Typeevent.vendor.type |
The type of event, either polling or webhook. |
string |
Event Notification Callback URLevent.notification.callback.url |
The URL where you want Cloud Elements to send the events. | string |
Callback Notification Signature Key event.notification.signature.key |
Optional. A user-defined key for added security to show that events have not been tampered with. | string |