The docs are moving!
Find us at our new Help Center where we've combined our documentation and knowledgebase articles in one easy-to-search location.
We aren't updating the Developer Portal anymore, except for the Element Docs — all updates happen in the Help Center. We're retiring the Developer Portal as you know it in:
Manage Accounts
If you are the user who created the organization, you are the organization administrator and you can manage the accounts related to it. You can create, retrieve, update, delete, and search accounts. To manage accounts, you must log in as the organization administrator. Even a user that you add to the default account cannot access the account management pages.
Find Accounts
You can access your accounts on the Accounts page in Security.
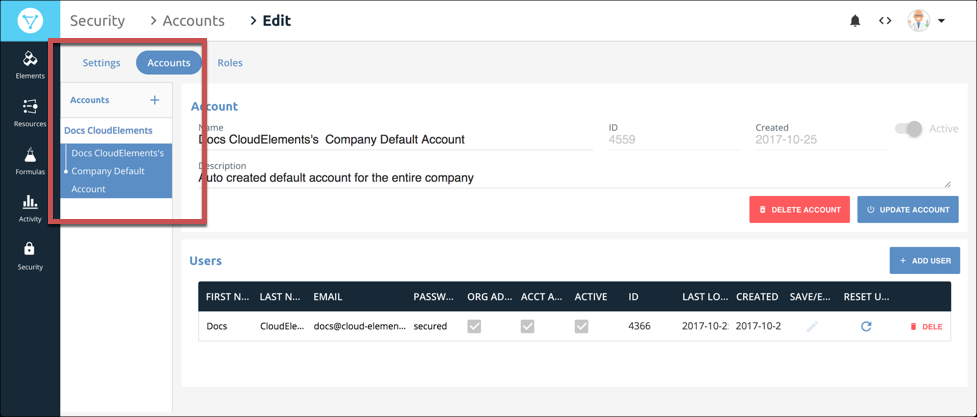
Account Attributes
Each account includes attributes that you can use to identify the account or interact with it in the /accounts APIs.
The attribute names that appear only in the JSON response appear in code format.
| Name | Description |
|---|---|
ID id |
The unique identifier for an account within an organization. Use in any /accounts endpoint with an {id} variable. |
Namename |
The name of the account. |
Descriptiondescription |
A brief description of the account. |
Activeactive |
Indicates if the account is active. In the JSON response true is active and false is inactive. |
companyId |
The unique identifier of the organization created at initial signup. |
CreatedcreatedDate |
The date when the organization administrator created the account. |
externalID |
A unique identifier for the account, required to add an account using POST/ accounts. |
defaultAccount |
Indicates if the account is an organization level account — true — or account level — false. |
type |
Indicates the type of account, either account level — CompanyAccount — or organization level — Default. |
Add an Account
As an organization administrator, you can add an account to your organization. Accounts typically represent your customer.
To add an account:
- Click
 to open the the Security Settings page.
 - Click the Accounts tab.
- Click the add accounts button.
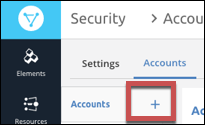
- Enter a name for the account, and then click Create.
- Update the description to provide more information about the account.
Cloud Elements creates a new account. The new account has no users, so your next step is to create a user for the new account.
Add Users to Accounts
As the organization-level user, you can add users to any accounts that you create. When you create or update a user, you can assign specific roles to them. You can assign the Organization Administrator role to any user in the default account, but not to users outside of the default account. See Manage Roles for more about roles and privileges.
To create a user for an account:
- Access the Accounts Edit page, either by creating a new account or click the account name in the list of accounts.
- In the Users section click Add User.
- Complete the First Name, Last Name and Email fields.
- Complete the Password field with a password that meets the password policy you configured on the Settings tab.
- If you want the user to be an organization or account administrator, select Org Admin or Account Admin. If you do not select either administrator role, the user receives a default role. See Manage Roles for more information about what each role can access.
- Click
 .
.
After you create a user, they do not receive any notification. This is because many users do not need to access Cloud Elements directly. If the new user needs to access Cloud Elements, either give them the password that you entered or encourage them to reset their password.
New users are automatically active, allowing them access to Cloud Elements. You can deactivate the user later if they no longer need access.
Change an Account Name or Description
You can update the name or description of any account.
To update an account:
- Access the Accounts Edit page.
- Update the name or description.
- Click Update Account.
Deactivate and Reactivate an Account
You can deactivate an account, making it unavailable for use. If you need to reactivate an account, you must use the Cloud Elements APIs. Deactivating an account essentially performs the same action as deleting an account. After you deactivate an account, you cannot view it in Cloud Elements 2.0. You can still find the account using the Cloud Elements APIs. Use the account id with /accounts endpoints that use the {id} variable.
Delete an Account
You can delete an account, which also deactivates any users associated with the account. Deleting an account essentially performs the same action as deactivating an account. You can recover a deleted account by reactivating it with the Cloud Elements APIs. After you delete an account, you cannot view it in Cloud Elements 2.0. You can still find the account using the Cloud Elements APIs. Use the account id with /accounts endpoints that use the {id} variable.
If you delete an account that also has users associated with it, the account deletion deactivates the users. If you reactivate the account and want to keep the same users, you must reactivate them separately.
To delete an account:
- Access the account page.
- Click Delete Account.
- Confirm the deletion.